How to Change Brake Pads
First, gather your lug wrench, C-clamp, socket set, brake cleaner, and new brake pads, ensuring safety gear is on. Changing brake pads requires preparation and the right tools to do the job safely and effectively.
Park on a flat surface, apply the parking brake, and use a jack and stands to securely lift the vehicle. Loosen the caliper bolts carefully, then remove the worn brake pads.
Next, compress the piston using the C-clamp to make room for the new pads. Install the new brake pads, reassemble the caliper, and torque the bolts properly.
Finally, press the brake pedal several times to set the pads, and test the brakes at low speed to ensure proper function. Follow these steps thoroughly to master brake pad replacement.
Key Takeaways
- Gather necessary tools like lug wrench, C-clamp, socket set, brake cleaner, and new brake pads before starting the job.
- Safely lift and secure the vehicle using a floor jack, jack stands, and wheel chocks on a flat surface.
- Loosen caliper bolts, remove old brake pads, inspect rotors, and compress the caliper piston before installing new pads.
- Align new brake pads correctly, reattach the caliper, and torque bolts to the manufacturer’s specifications.
- Test brakes by pressing the pedal multiple times, performing low-speed stops, and bedding pads for optimal performance.
Why You Need to Change Your Brake Pads
Why should you change your brake pads regularly? Think of brake pads like the soles of your shoes; they wear down with use and need replacement to maintain proper function. Ignoring this risks reduced stopping power and potential damage to rotors.
An inventive analogy compares worn brake pads to a frayed rope. If neglected, the entire braking system can fail. Common myths suggest brake pads last forever or only need changing when noise appears, but these misconceptions can lead to dangerous delays.
Regular replacement ensures optimal friction and safety. You should inspect pads for thickness and performance degradation routinely. By understanding the mechanical necessity rather than relying on myths, you maintain your vehicle’s braking efficiency and prevent costly repairs.
Get Your Tools Ready for the Job
Maintaining your vehicle’s braking efficiency means you’ll need to replace worn brake pads safely and correctly. Begin by gathering all necessary tools: a lug wrench, C-clamp, socket set, brake cleaner, and new brake pads. Prioritize tool organization by arranging everything within easy reach to streamline the work process. Use a sturdy toolbox or magnetic tray to prevent losing small parts.
Tool safety is critical. Inspect each tool for damage before use, and wear gloves and eye protection to avoid injury. Ensure your workspace is well-lit and clean to reduce hazards. Proper tool handling prevents accidents and damage to components. By preparing meticulously, you’ll create an efficient, safe environment, allowing you to focus on precise brake pad replacement without interruptions or risks.
Lift and Secure Your Vehicle to Access Brake Pads
How do you safely lift and secure your vehicle to access the brake pads? First, ensure tool readiness by gathering a hydraulic floor jack, jack stands, and wheel chocks. Park on a flat, solid surface and engage the parking brake.
Position wheel chocks behind the wheels opposite the side you’re lifting. Use the jack to lift the vehicle at the manufacturer-specified jacking point, found in your owner’s manual. Once elevated, place jack stands securely under the frame or recommended support points.
Slowly lower the vehicle onto the stands, ensuring it sits stable and level. Never rely solely on the jack to hold the vehicle. Confirm the car is firmly secure by gently shaking it before removing the wheel. This method ensures safe, stable access to the brake pads.
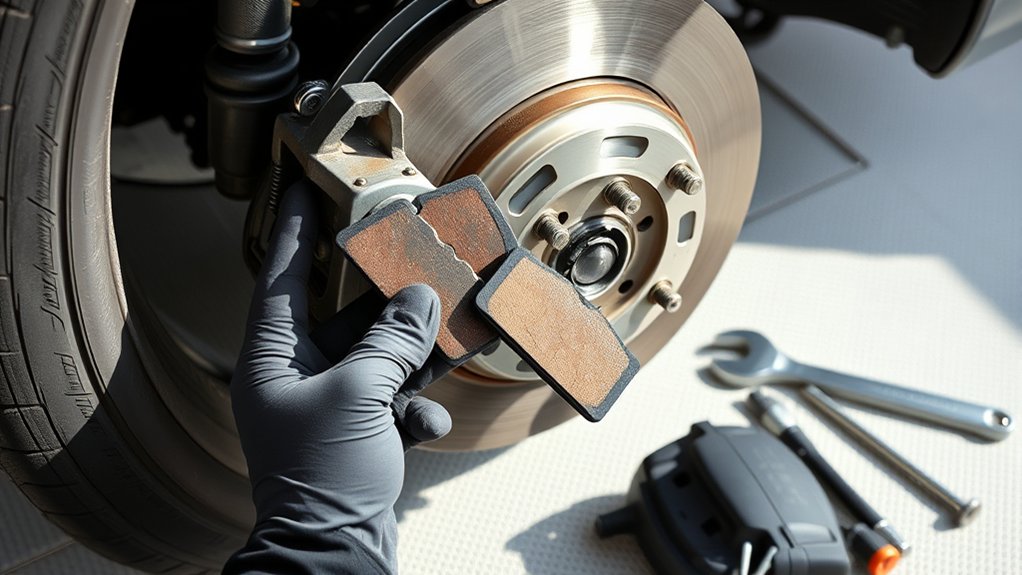
Remove Old Brake Pads and Install New Ones
When removing old brake pads, start by carefully loosening the caliper bolts to free the caliper without damaging the brake line. Next, slide out the worn pads, noting the type of pad materials used, as this affects performance and rotor compatibility.
Inspect the rotors for wear; uneven surfaces or grooves indicate a need for resurfacing or replacement.
Before installing new pads, compress the caliper piston to ensure proper fit. Align the new pads correctly, then reattach the caliper. Torque the bolts to manufacturer specifications.
| Step | Detail |
|---|---|
| Loosen Caliper | Avoid brake line damage |
| Remove Pads | Note pad materials |
| Inspect Rotors | Check for rotor wear |
| Install New Pads | Compress piston, secure caliper |
Test Your Brakes and Ensure Everything Works
Why is it essential to test your brakes immediately after installation? Testing ensures that the new brake pads engage correctly and that the braking system functions safely. Begin by gently pressing the brake pedal multiple times to build hydraulic pressure and seat the pads against the rotors.
Next, perform a controlled test braking at low speed in a safe area to verify responsiveness and detect any unusual noises or vibrations. If the brakes feel spongy or ineffective, recheck the installation and brake fluid levels.
Proper initial test braking also contributes to optimal pad longevity by helping the pads bed evenly. Once satisfied with braking performance, gradually increase braking force to complete the bedding process. This step guarantees your brakes will provide consistent stopping power and durability.
Frequently Asked Questions
How Often Should Brake Pads Be Replaced on Average?
You should replace brake pads every 30,000 to 70,000 miles, depending on driving habits. Use newbie-friendly tips to inspect them during seasonal maintenance, ensuring optimum safety and performance without guesswork or delay.
Can Worn Brake Pads Damage Other Brake Components?
Like sandpaper grinding metal, worn pads can damage rotors and calipers. If you ignore brake noise, you risk costly repairs.
Always inspect worn pads promptly to prevent further brake component damage and ensure safe vehicle operation.
What Types of Brake Pads Are Best for Different Driving Conditions?
You’ll want ceramic pads for daily driving, semi-metallic for performance, and organic for quiet rides.
Always check tire pressure and schedule oil changes regularly to maintain overall vehicle safety and brake efficiency under varying conditions.
Are Ceramic Brake Pads Better Than Semi-Metallic Ones?
Ceramic brake pads offer superior ceramic longevity and produce less dust, but semi-metallic pads excel in semi metallic heat tolerance, making them better for high-performance or heavy-duty use.
Choose based on your driving needs.
Can I Change Brake Pads on All Vehicle Models Myself?
Like fixing a complex watch, not all brake pads fit every vehicle. You’ll need specific changing tools and safety gear for each model.
Always check compatibility and follow precise instructions to guarantee safe, effective brake maintenance.
Conclusion
Changing your brake pads is essential—did you know worn pads can increase stopping distance by up to 70%? By following these precise steps, you guarantee your vehicle stays safe and responsive. Always prepare your tools, securely lift your car, carefully replace the pads, and thoroughly test your brakes before hitting the road.
Staying proactive with brake maintenance not only protects you but also enhances your vehicle’s overall performance and longevity. Regularly changing your brake pads is a key part of this upkeep, ensuring your brakes function effectively every time you drive.