How to Patch a Tire
To patch a tire, start by locating and marking the puncture. You can do this by visually inspecting the tire or using soapy water to find air bubbles indicating the leak.
Next, remove any debris from the puncture area and roughen the surface with sandpaper. This helps the patch adhere better.
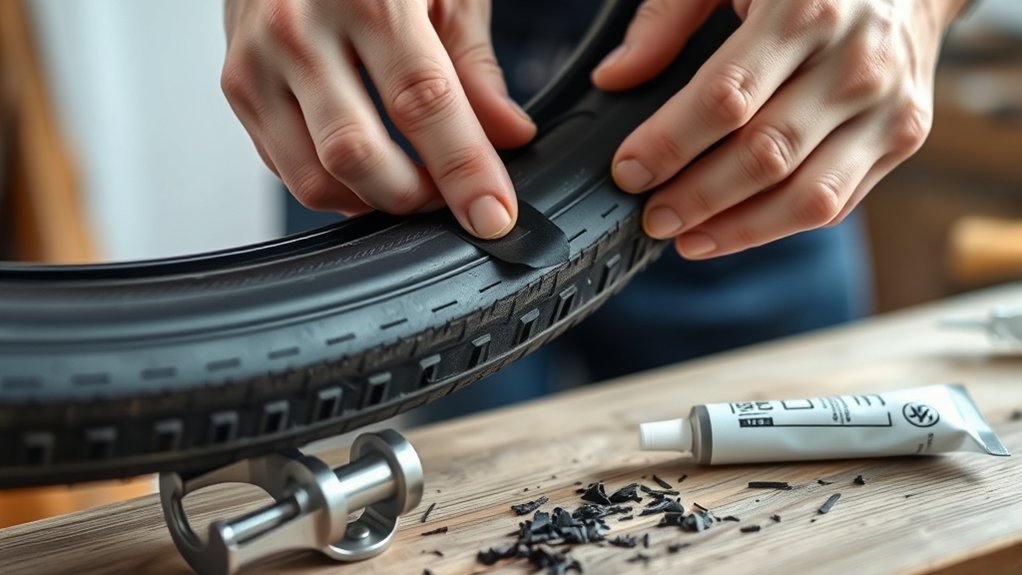
Apply vulcanizing cement evenly over the roughened area and wait until it becomes tacky. Then, position the correct-size patch over the puncture, pressing firmly.
Roll the patch to remove any air gaps and ensure a strong bond. Allow the repair to cure properly before proceeding.
Finally, check the tire pressure with a gauge and inflate the tire to the manufacturer’s recommended specifications. Follow these steps precisely for a lasting repair, and consult additional guidance for different tire types and maintenance tips.
Key Takeaways
- Locate the puncture by visual inspection, listening for air leaks, or using soapy water to find bubbling spots.
- Prepare the damaged area by cleaning, roughening with a tire buffer or sandpaper, and wearing protective gloves and eyewear.
- Apply vulcanizing cement evenly, let it dry until tacky, then position a correctly sized patch centered over the puncture.
- Press the patch firmly and evenly to eliminate air gaps, ensuring a strong airtight seal for durability.
- After patching, regularly inspect for peeling, cracks, or leaks, and maintain proper tire pressure to support patch longevity.
When to Patch or Replace a Tire
When should you decide to patch a tire instead of replacing it? You should evaluate the damage location, size, and tire condition. Opt for patching when the puncture is within the tread area, smaller than ¼ inch in diameter, and not near the sidewall or shoulder.
Tires with excessive wear, sidewall damage, or multiple punctures require replacement. The patch vs replacement decision hinges on safety and tire integrity.
When to patch depends on confirming the tire’s structural soundness and ensuring the puncture is repairable from the inside. If the tire has internal damage or the puncture is too large, replace it.
Prioritize proper inspection to determine whether patching can restore the tire’s functionality or if replacement is necessary to maintain safe operation.
Essential Tools for Patching Tires
What tools do you need to patch a tire effectively? Start with a tire repair kit that includes a rasp tool and an insertion tool. The rasp cleans and roughens the puncture area, ensuring proper adhesion.
Begin with a tire repair kit featuring a rasp and insertion tool to prepare the puncture for a secure patch.
Use a tire buffer or sandpaper to prepare the surface further. For tire patching safety, always wear gloves and eye protection to prevent contact with chemicals or debris.
Select the proper patch based on your tire’s size and type. Rubber patches work best for tubeless tires, while inner tube patches suit tube-type tires.
You’ll also need vulcanizing cement or adhesive to bond the patch securely. A pressure gauge helps verify tire inflation after repair.
Having these tools ready guarantees a safe, reliable, and efficient patching process.
How to Patch a Tire Step-by-Step
Begin by locating the puncture on your tire and removing any embedded objects. Next, use sandpaper to roughen the puncture area, improving adhesive bonding.
Apply vulcanizing cement evenly over the cleaned surface, then wait for it to become tacky. Carefully position the patch, ensuring it fully covers the hole without wrinkles or air bubbles.
Press firmly to secure it, and use a roller to enhance adhesion and patch durability. Allow the patch to cure as specified by the manufacturer.
Throughout the process, adhere to patching ethics by using appropriate materials and following recommended procedures to ensure safety and reliability. Properly executed, this method restores tire integrity, extending its service life while maintaining safe performance standards.
Common Tire Patching Mistakes to Avoid
Following the correct patching steps guarantees a secure repair, but overlooking common errors can compromise the tire’s integrity and safety. To ensure success, avoid these common mistakes during patch prep and application:
Proper patching ensures tire safety; avoid common prep mistakes to maintain repair integrity.
- Failing to clean and roughen the damaged area thoroughly, which prevents proper adhesion
- Using an incorrectly sized patch that doesn’t cover the puncture fully
- Skipping the vulcanizing cement or applying it unevenly, reducing bond strength
- Neglecting to allow the cement to dry to a tacky consistency before patch placement
- Applying patches on sidewalls or beyond the tire’s repairable zone
How to Find a Tire Puncture
Start by carefully inspecting the tire surface for any visible damage or embedded objects. Next, listen closely for hissing sounds that indicate escaping air. If you don’t spot the puncture visually or audibly, apply a soapy water solution to the tire and watch for bubbles forming at the leak site.
Visual Inspection Techniques
A thorough visual inspection is essential to accurately locate a tire puncture before applying a patch. Begin by conducting a detailed surface inspection, scanning for subtle visual cues such as embedded objects or irregularities in the rubber. Use adequate lighting to enhance visibility.
Look closely for:
- Small nails, glass shards, or metal fragments lodged in the tire
- Cuts, cracks, or abrasions disrupting the tire’s smooth surface
- Bulges or deformities indicating internal damage
- Areas where the tread appears compressed or uneven
- Signs of air escaping, like dust or moisture accumulation around a potential puncture
Listening For Air Leaks
After completing a visual inspection, you can narrow down the potential puncture area by listening for escaping air. Use precise listening techniques by positioning your ear close to the tire surface and moving slowly around the circumference.
Focus on detecting subtle hissing sounds, which indicate air leak detection. A quiet environment improves accuracy. If necessary, use a piece of hollow tubing or a mechanic’s stethoscope to amplify sounds.
| Listening Technique | Purpose |
|---|---|
| Ear close to tire | Detect faint hissing |
| Slow circumferential sweep | Locate exact puncture site |
| Hollow tube amplification | Enhance sound detection |
| Quiet surroundings | Minimize background noise |
Following these steps ensures you identify the puncture efficiently before proceeding to patch the tire.
Using Soapy Water Test
To pinpoint the exact location of a tire puncture, you’ll want to apply a soapy water solution directly onto the tire surface. This method helps identify air escaping from small punctures that are otherwise difficult to detect. When bubbles form, you’ve found the leak.
Follow these steps carefully, keeping safety considerations in mind to avoid injury:
- Mix water with a few drops of liquid soap.
- Use a sponge or spray bottle to apply the solution evenly.
- Rotate the tire slowly while inspecting all surfaces.
- Watch closely for consistent bubble formation.
- Mark the puncture spot for effective patching.
This technique complements other patching methods by providing a reliable, non-invasive way to locate leaks before repair. Always ensure the tire is deflated to a safe pressure during testing.
Patching Bike, Car, and Motorcycle Tires
When patching bike, car, and motorcycle tires, you need to recognize the differences in tire construction and pressure requirements. Gather essential tools like a tire lever, patch kit, and a pressure gauge specific to each tire type. Proper preparation ensures a secure and lasting repair.
Tire Type Differences
How do you approach patching different types of tires effectively? Understanding tire type differences is essential for ensuring patch readiness and durability. Bike, car, and motorcycle tires vary in thickness, pressure tolerance, and construction, which directly affects your patching technique.
Bike tires require thin, flexible patches suitable for lower pressure and narrow tubes. Car tires demand durable patches that withstand high pressure and heat. Motorcycle tires need patches designed for curved surfaces and moderate pressure.
Always inspect the tire’s inner liner and casing for damage before patching. Prepare the surface by roughening it to enhance adhesive bonding regardless of tire type.
Tailoring your method to the specific tire type ensures a secure, lasting repair every time.
Essential Repair Tools
Which tools do you need to patch bike, car, and motorcycle tires effectively? First, gather a tire lever or spoon to remove the tire from the rim. Next, use a tire buffer or sandpaper to roughen the puncture area, ensuring adhesive bonds properly. This counters common tire patching myths that prepping isn’t necessary.
You’ll also need a vulcanizing glue or rubber cement designed for tire repair, plus a patch kit with appropriately sized patches. A valve core remover and air pump or compressor help you deflate and reinflate the tire accurately.
Lastly, a sharp knife or scissors trims excess patch material. Using these tools precisely maximizes patch longevity by ensuring a strong, airtight seal, critical across all tire types for durable, safe repairs.
Tire Maintenance After Patching
Although patching a tire restores its immediate functionality, you need to monitor the repair area regularly to assure it holds under pressure and stress. To maintain patch durability, inspect the patched section for any signs of peeling, cracking, or air leakage.
Regularly check patched tires for signs of wear to ensure lasting repair and safety.
Always follow precise inflation guidelines to avoid over- or under-inflation, which can compromise the patch and tire integrity. Additionally, balance and alignment checks are vital for even wear and prolonged patch life.
Check tire pressure weekly using a calibrated gauge
Inspect the patch for visible damage or bubbles
Avoid aggressive driving that stresses the patched area
Rotate tires regularly to ensure uniform wear
Adhere strictly to manufacturer inflation guidelines
Following these steps will help you sustain tire performance and safety after patching.
Frequently Asked Questions
Can Tire Patches Affect Tire Balance?
Yes, tire patches can affect tire balance if the patch material is uneven or improperly applied. You should use precise repair techniques to ensure uniform weight distribution and maintain proper tire balance for safe driving performance.
Are Tire Patches Safe for High-Speed Driving?
You wouldn’t want your tire patch to explode at 200 mph, right? For high-speed safety, ensure your patch durability meets industry standards.
Properly applied patches withstand stress, letting you drive confidently without risking catastrophic failure.
How Long Does a Tire Patch Typically Last?
A tire patch typically lasts 5 to 7 years, but tire patch longevity depends on patch lifespan factors like driving conditions, tire maintenance, and repair quality.
You should monitor the tire regularly to ensure safety and durability.
Can I Patch a Tire With a Sidewall Puncture?
Patching a sidewall puncture is like putting a Band-Aid on a broken bone. It won’t hold. Due to sidewall limitations, patch durability is poor.
You shouldn’t patch sidewalls but replace the tire for safety and reliability.
Do Tire Patches Work in Extreme Weather Conditions?
You’ll find tire patches generally maintain patch durability in extreme weather, but temperature fluctuations can affect adhesion.
Ensure you use high-quality patches designed for harsh climates to maximize performance and prevent failures under severe conditions.
Conclusion
Patching a tire is like sewing a wound—you need precision and the right tools to ensure a secure fix. By following the steps carefully, you can extend your tire’s life and maintain safety.
Always inspect your patch job thoroughly and avoid common errors to prevent future issues.
Remember, timely maintenance after patching keeps your tire performing at its best, so treat it with the same care you would any critical mechanical repair. Proper patching a tire is essential for long-lasting results.