How to Charge Motorcycle Battery With Battery Charger
To charge your motorcycle battery with a battery charger, first ensure the voltage drops below 12.4 volts or the battery has been inactive for a while. Clean the terminals and check the electrolyte level if applicable.
Connect the charger with the power off—attach the positive clamp first, then the negative clamp to the frame or terminal. Set the charger type and voltage according to your battery chemistry to avoid damage.
Monitor the voltage during charging to prevent overcharging. Once charged, test the battery before reinstalling it. Understanding these steps helps maintain performance and extend battery life.
When to Charge Your Motorcycle Battery and Why It Matters
When should you charge your motorcycle battery to ensure optimal performance and longevity? You should charge it when the voltage drops below 12.4 volts or after extended inactivity. Battery chemistry plays a crucial role. Lead-acid and lithium-ion batteries have different charging thresholds and sensitivities.
Charging too late risks deep discharge, which damages cells and shortens battery life. Charging too frequently without need accelerates wear. Monitoring voltage regularly helps maintain peak performance.
Additionally, proper charging minimizes the environmental impact by reducing the need for premature battery replacements, which contribute to hazardous waste. Avoiding over-discharge and overcharge cycles preserves battery efficiency and reduces resource consumption. Staying proactive with charging aligns with both technical best practices and eco-friendly motorcycle maintenance.
Preparing Your Motorcycle Battery Before Charging
How do you guarantee your motorcycle battery is ready for charging? Begin by inspecting the battery terminals for corrosion and clean them if needed. Check electrolyte levels if your battery isn’t sealed; top up with distilled water to maintain optimal performance.
Proper battery storage is crucial. Store in a cool, dry place to prevent capacity loss. Ensure the battery is disconnected from the motorcycle to avoid electrical damage. Preparing your battery this way enhances starter reliability and extends its lifespan.
| Step | Action | Purpose |
|---|---|---|
| 1 | Inspect terminals | Remove corrosion |
| 2 | Check electrolyte levels | Maintain charge capacity |
| 3 | Fill with distilled water | Prevent dry cells |
| 4 | Store in cool, dry location | Reduce self-discharge |
| 5 | Disconnect battery | Avoid electrical shorts |
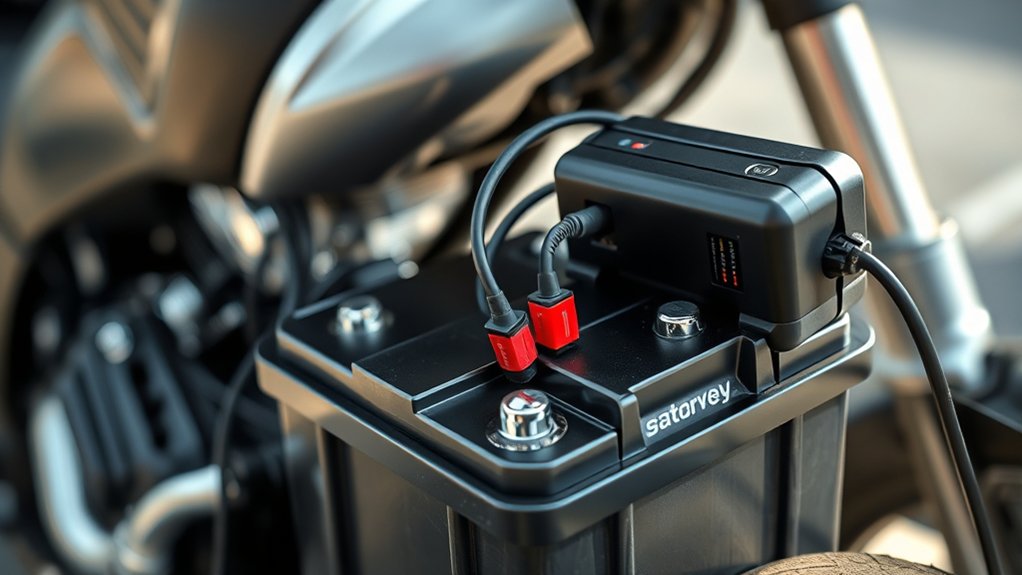
How to Connect Your Charger Safely, Step by Step
After preparing your motorcycle battery properly, the next step is to connect your charger safely to guarantee effective charging and prevent damage. Begin by ensuring your charger selection matches your battery type and voltage.
Turn off the charger before making any connections to prioritize connection safety. Attach the positive (red) clamp to the battery’s positive terminal first. Then, connect the negative (black) clamp to the negative terminal or a grounded metal part on the motorcycle frame, avoiding direct battery contact when possible to reduce spark risks.
Double-check all connections for firmness and correct polarity. Only after securing clamps should you plug in and power on the charger. Following these precise steps minimizes hazards and ensures optimal charger performance for your motorcycle battery.
Setting Your Motorcycle Battery Charger for Different Battery Types
Why does setting your charger correctly for different battery types matter? Each motorcycle battery chemistry, lead-acid, AGM, or lithium-ion, requires specific voltage and current settings. Using incorrect settings can damage the battery or reduce its lifespan.
Avoid charger myths suggesting one setting fits all; these are alternative myths that can lead to costly errors. Always check your battery’s specifications and select the matching mode on your charger.
For lead-acid batteries, use a slower charge rate. AGM batteries need a slightly higher voltage with controlled current. Lithium-ion demands precise voltage limits and protective circuitry.
Modern smart chargers often include presets for these types, simplifying the process. Setting your charger properly ensures optimal charging efficiency and battery health, preventing damage caused by incorrect charging protocols.
How to Monitor Charging and Avoid Overcharging
When should you check your motorcycle battery during charging to prevent overcharging? You should inspect the battery every hour, especially during the initial stages of charging. Use a voltmeter or the charger’s built-in indicator to monitor voltage and current flow.
Overcharging causes battery degradation, reducing battery preservation and ultimately impairing fuel economy by forcing your engine to work harder. Once the battery reaches its full charge voltage, typically around 12.6 to 13.2 volts for a 12V battery, stop the charging process immediately.
Avoid leaving the charger connected unattended for extended periods. Employing a smart charger with an automatic shutoff feature can help maintain optimal charge levels and protect your battery’s lifespan. Careful monitoring ensures safe charging and maximizes both battery performance and fuel efficiency.
What to Do After Charging: Testing and Reinstalling Your Battery
Once charging is complete, check the battery voltage with a multimeter to ensure it’s fully charged. Inspect the terminals for corrosion or damage and clean them if necessary. Finally, reinstall the battery securely in your motorcycle to maintain proper connection and safety.
Battery Voltage Testing
How can you confirm that your motorcycle battery is fully charged and ready for use? Start with battery voltage testing using a reliable multimeter. Set the multimeter to DC voltage, then connect the positive lead to the battery’s positive terminal and the negative lead to the negative terminal.
A fully charged 12-volt motorcycle battery should read around 12.6 to 12.8 volts. Readings below 12.4 volts indicate the battery needs more charging.
Perform this test in a well-ventilated area, following charging safety protocols to avoid sparks or short circuits. Avoid wearing metal jewelry and ensure the charger is disconnected during testing to prevent inaccurate readings.
Once you confirm the voltage, you can proceed to reinstall the battery safely, confident that it’s ready to power your motorcycle effectively.
Inspect Battery Terminals
Why should you inspect your motorcycle battery terminals after charging? Ensuring the terminals are clean and secure is crucial for reliable electrical contact and optimal performance.
Start by visually checking for corrosion, dirt, or residue that can impede current flow. Use a wire brush or terminal cleaner to remove buildup.
After cleaning, perform an irrelevance check. Avoid distractions or unrelated tasks that cause topic drift, ensuring your focus remains on terminal condition.
Next, verify that the terminals aren’t loose or damaged; loose connections can cause starting issues or electrical faults. Inspect for cracks or wear that might require replacement.
Proper terminal inspection after charging prevents future power loss and battery damage, helping maintain your motorcycle’s electrical system integrity. This step sets you up for a reliable reinstall process.
Reinstalling Battery Securely
After ensuring the battery terminals are clean and secure, the next step is to test the battery’s charge level and reinstall it properly. Use a multimeter to confirm the voltage meets manufacturer specifications before reinstalling.
Position the battery firmly in its compartment, ensuring it doesn’t shift during rides. Secure the hold-down clamp to prevent vibration damage, and reconnect the terminals, positive first then negative, to avoid sparks.
Tighten connections to manufacturer torque specs to maintain battery safety. Once reinstalled, check for signs of corrosion or loose connections.
If the battery is damaged or no longer holds a charge, follow local disposal guidelines for safe recycling. Proper handling and secure installation extend battery life and protect your motorcycle’s electrical system from potential hazards.
Choosing the Right Motorcycle Battery Charger
Selecting the right motorcycle battery charger guarantees efficient charging and prolongs your battery’s lifespan. Choose a charger compatible with your battery’s voltage and type, such as lead-acid or lithium-ion.
Opt for a smart charger with automatic shutoff and desulfation features to prevent overcharging and extend battery life. Avoid chargers that deliver excessive current, which can damage the battery. Prioritize units with clear indicator lights and safety certifications.
Proper charger maintenance is essential; clean terminals and inspect cables regularly to ensure optimal performance. When replacing a battery, follow proper battery disposal guidelines to minimize environmental impact.
Troubleshooting Motorcycle Battery Charging Issues
If your motorcycle battery isn’t charging properly, start by identifying common issues like a faulty charger or battery. Check the battery’s health with a multimeter to spot any underlying problems. Also, ensure all connections are clean and secure to maintain proper charging flow.
Common Charging Problems
Why isn’t your motorcycle battery charging properly? Common issues include loose or corroded connections, incorrect charger settings, and faulty wiring. Check that terminals are clean and tight. Poor contact disrupts charging.
Avoid relying on race track myths, such as “charging faster with engine running,” which can damage your battery and electrical system. Also, don’t let motorbike aesthetics compromise function; decorative covers may block ventilation, causing overheating during charging.
Ensure you use a charger compatible with your battery type and voltage. If the charger’s indicator doesn’t show charging or completion, verify the power source and charger functionality. Address these common problems systematically to maintain battery health and avoid unnecessary replacements or breakdowns.
Diagnosing Battery Health
How can you tell if your motorcycle battery is truly failing or if the issue lies elsewhere? Begin with diagnostic testing using a multimeter to measure voltage and guarantee it holds a charge above 12.4 volts.
Next, perform an electrolyte comparison if your battery is not sealed. Check each cell’s specific gravity with a hydrometer; uneven readings indicate sulfation or cell damage. Consistent low values across cells suggest an overall weak battery.
Also, inspect for visible corrosion or leaks, which can affect performance. If diagnostic testing and electrolyte comparison confirm poor battery health, it’s time to replace it. This precise approach helps you avoid misdiagnosing charging issues caused by faulty wiring or a failing regulator, which you’ll address separately.
Fixing Connection Issues
Where do most motorcycle battery charging problems actually stem from? They often arise from poor connections rather than the battery chemistry or charger itself. To fix connection issues, follow these steps:
- Inspect terminals for corrosion or dirt; clean with a wire brush to ensure solid contact.
- Verify all clamps and connectors are tight and secure; loose connections cause intermittent charging.
- Check charger cables for damage or frayed wires; replace if necessary to maintain proper current flow.
- Perform regular charger maintenance, including inspecting for wear and testing output voltage, to avoid false faults.
Addressing these points ensures efficient charging and prolongs battery life. Remember, correct connector maintenance complements understanding your battery’s chemistry, optimizing the entire charging process.
Frequently Asked Questions
Can I Charge My Motorcycle Battery With a Car Battery Charger?
Yes, you can use a car battery charger, but choose one with motorcycle settings to guarantee proper charging. Prioritize battery safety by controlling voltage and amperage.
Two-word discussion ideas include “charging rate” and “battery compatibility.”
How Long Does a Full Charge Typically Take?
Back in the days of steam engines, a full charge typically takes 4-8 hours. You’ll want to follow proper charging guidelines to guarantee battery maintenance, preventing overcharging and extending your motorcycle battery’s lifespan effectively.
Is It Safe to Charge a Frozen Motorcycle Battery?
You shouldn’t charge a frozen battery due to frozen battery risks like cracking or explosion. Instead, let it thaw at room temperature first.
Follow safe charging steps only once the battery is fully thawed and inspected.
Can I Charge a Damaged or Leaking Battery?
You shouldn’t charge a damaged battery or one with a battery leak because it risks fire or acid exposure. Instead, safely dispose of it and replace it to protect yourself and your motorcycle’s electrical system from harm.
How Often Should I Charge a Battery During Long Storage Periods?
You should charge your battery every 4-6 weeks during long storage, especially if your motorcycle has busy headlights or cruise control, as these features drain power even when off. Use a smart charger for best results.