Which Way to Turn Oil Filter
You’ll turn the oil filter counterclockwise to loosen and remove it, as this is the standard thread direction designed for proper sealing and safety.
Clockwise motion tightens the filter to prevent leaks during operation, aligning with typical mechanical fasteners.
Use a proper oil filter wrench for a secure grip, avoid overtightening, and ensure the mounting surface is clean.
Follow these steps carefully, and you’ll find how to install and maintain filters effectively comes more clearly into view.
Key Takeaways
- Turn the oil filter counterclockwise to loosen and remove it.
- Clockwise turning tightens the oil filter and ensures a proper seal.
- Use a proper oil filter wrench for better grip and easier removal.
- Avoid over-tightening by hand-tightening plus an additional 3/4 to 1 turn after gasket contact.
- Always confirm the old gasket is removed before installing the new filter to prevent leaks.
Which Way to Turn an Oil Filter to Loosen It
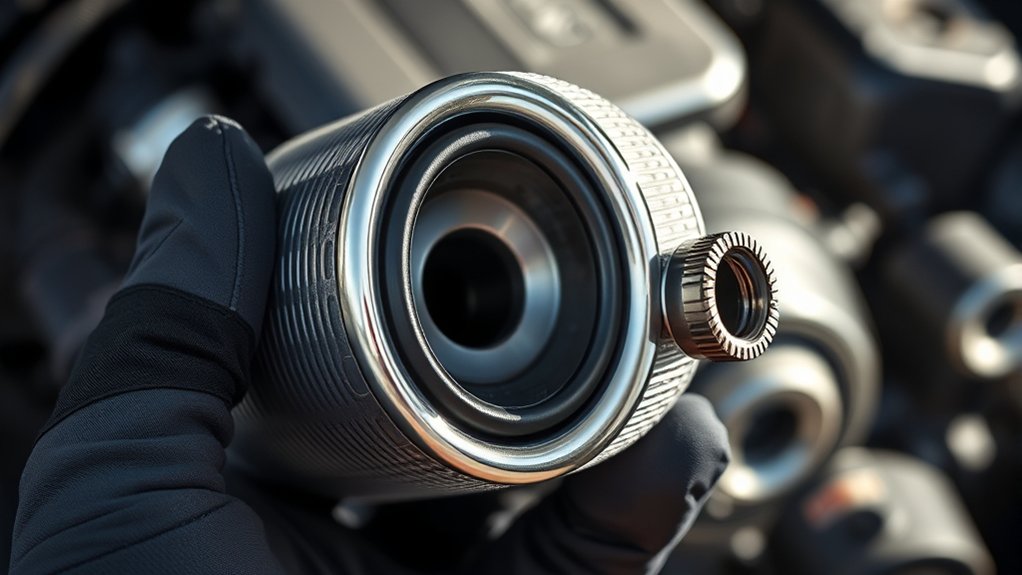
When you need to loosen an oil filter, you’ll turn it counterclockwise. This is the standard direction to unscrew most oil filters, designed for easy removal during routine maintenance. Think of it like navigating a random garden: you follow a clear path, avoiding obstacles, to reach your goal efficiently.
In urban planning, this approach parallels how infrastructure aligns with functional flow. Here, the oil filter’s threads guide your turn. Applying steady, controlled force counterclockwise ensures you don’t damage the filter housing or surrounding components.
Use a proper oil filter wrench to maintain grip, especially if the filter is tight. Remember, turning clockwise tightens the filter, so reversing that motion is essential for removal. This method keeps your vehicle’s oil system serviceable and secure.
How Oil Filter Threads Work: Why They Tighten Clockwise
You’ll find that oil filter threads are designed to tighten clockwise, matching standard thread direction. This guarantees the filter seals properly to prevent oil leaks during engine operation. Understanding this thread behavior helps you apply the right force and avoid damage when installing or removing the filter.
Thread Direction Basics
Why do oil filters tighten clockwise? It’s all about thread direction basics. Standard right-hand threads ensure you turn the filter clockwise to secure it. This uniformity simplifies installation and removal, reduces cross-threading risk, and aligns with most mechanical fasteners.
When you replace an oil filter, understanding thread direction helps prevent leaks and damage to the engine.
Keep these key points in mind:
- Oil filter threads follow a right-hand (clockwise) tightening convention.
- Proper torque prevents stripping and ensures a tight seal.
- Incorrect removal or installation affects disposal methods, potentially causing oil spills.
- Responsible disposal minimizes environmental impact.
- Thread designs vary slightly but maintain clockwise tightening for consistency.
Mastering thread basics makes oil filter changes safer, cleaner, and more efficient.
Clockwise Tightening Reason
Although thread direction might seem arbitrary, manufacturers standardize oil filter threads to tighten clockwise to match the engine’s rotational forces. When the engine runs, its rotation tends to tighten the filter rather than loosen it, preventing accidental disengagement.
This design ensures the oil filter remains securely seated under operating conditions. Understanding this principle helps you avoid confusion with irrelevant topics, such as left- or right-hand threads on unrelated components, which don’t apply here.
The clockwise tightening standard isn’t an arbitrary choice or an unrelated concept. It’s a deliberate engineering solution aligned with torque direction and safety. So, when you install your oil filter, turning it clockwise ensures proper engagement, matching the engine’s natural forces and preventing failure during operation.
Preventing Oil Leaks
How does the clockwise tightening of oil filter threads prevent leaks? The design ensures the filter seals firmly against the engine block as you tighten it, preventing oil leaks. Proper filter placement aligns the threads correctly, creating a tight seal that blocks oil from escaping.
If the filter isn’t turned clockwise or isn’t seated properly, gaps may form, leading to leaks.
To prevent oil leaks, you should:
- Always tighten the filter clockwise until snug
- Ensure correct filter placement before tightening
- Use a new gasket or inspect the existing one
- Avoid over-tightening to prevent thread damage
- Check for leaks after installation during engine operation
Following these steps guarantees a secure seal and protects your engine from oil loss.
Tools That Make Removing an Oil Filter Easier
You’ll want the right tools to remove an oil filter efficiently without damage. Common oil filter wrenches, strap tools, and various socket types each offer specific advantages depending on the filter’s accessibility and condition. Understanding these options helps you choose the best tool for a quick, secure removal.
Common Oil Filter Wrenches
Oil filter wrenches are essential tools that simplify the process of loosening and removing stubborn oil filters. When changing your vehicle’s oil, you’ll often need to remove the filter after draining the oil plug.
Since oil filters vary in size based on your engine’s oil capacity, having the right wrench ensures a secure grip without damaging the filter. Here are common types of oil filter wrenches you’ll find practical:
- Strap wrench: Uses a strong strap to grip various filter sizes.
- Cap wrench: Fits over the filter end, matching its diameter.
- Pliers wrench: Adjustable jaws that clamp onto the filter body.
- Chain wrench: Wraps a chain around the filter for firm grip.
- Socket wrench adapter: Connects to a ratchet for filters with specific end fittings.
Each tool helps you remove the filter efficiently and safely.
Benefits of Strap Tools
Why choose a strap tool when removing an oil filter? Strap tools provide a secure grip by wrapping tightly around the filter, allowing you to apply even torque without damaging its surface. This design is especially effective when dealing with filters tightened to withstand high oil pressure.
Unlike rigid wrenches, strap tools conform to various filter sizes and shapes, enhancing versatility and reducing slippage. Their simplicity means fewer parts can fail, and they’re less likely to deform the filter housing.
When oil pressure has caused a filter to bind firmly, a strap tool lets you exert consistent, controlled force, making removal safer and more efficient. Using strap tools minimizes the risk of leaks caused by filter damage, ensuring your engine maintains proper oil pressure after replacement.
Impact of Socket Types
How does the choice of socket type influence the ease of removing an oil filter? Selecting the right socket is vital for applying adequate torque without slipping or damaging the filter.
Unlike an irrelevant topic or unrelated concept, socket choice directly affects your efficiency and tool wear. You want a socket that grips the filter firmly and fits the specific filter type.
Consider these factors when choosing sockets:
- Compatibility with oil filter size and shape
- Material strength to withstand torque
- Design for easy access in tight engine spaces
- Non-slip features to prevent rounding off the filter
- Quick-connect options for faster tool changes
Using the correct socket type streamlines removal, reduces effort, and prevents damage, making the task more practical and reliable.
How to Safely Loosen a Stubborn Oil Filter
When you encounter a stubborn oil filter, the key is using the right tools and techniques to avoid damaging the filter or surrounding components. First, ensure the engine is cool to prevent burns and reduce oil leaks.
Use a proper oil filter wrench that fits snugly to apply even torque. If the filter won’t budge, apply penetrating oil around the base and let it sit for 10-15 minutes. Then, tighten the filter slightly before attempting to loosen it again; this can break the seal.
Avoid excessive force, which risks damaging the filter housing or causing oil leaks. Once loosened, carefully unscrew the filter by hand, keeping a drain pan underneath to catch residual oil.
Proper technique minimizes risks and ensures safe removal of oil filters.
Mistakes to Avoid When Removing Oil Filters
Which direction do you turn an oil filter to remove it? Typically, you turn it counterclockwise. Avoid these common mistakes to ensure proper removal and effective risk management:
- Using excessive force, which can damage the filter or housing
- Ignoring proper tool selection; choose a compatible filter wrench
- Overlooking safety gear, increasing injury risk
- Neglecting to verify hiring practices; only qualified personnel should perform removal
- Failing to drain oil beforehand, causing spills and contamination
Inspecting and Preparing the Area After Removing the Filter
Why is it essential to thoroughly inspect and prepare the area after removing the oil filter? This step ensures no debris, old gasket remnants, or oil residue remain, which could compromise the seal of the new filter.
Avoid distractions by steering clear of unrelated topics or tangential ideas that might lead you to overlook critical inspection points. Carefully examine the mounting surface for scratches, nicks, or corrosion.
Clean the area using a lint-free cloth and an appropriate solvent to remove oil and contaminants. Confirm the old filter’s rubber gasket is fully removed; leftover pieces can cause leaks.
This precise preparation prevents installation issues and maintains engine integrity, setting a solid foundation before proceeding to the next step.
How to Properly Install a New Oil Filter Without Problems
A proper oil filter installation starts by lubricating the new gasket with clean engine oil to guarantee a tight seal and prevent damage during tightening. Before proceeding, confirm filter compatibility with your vehicle to avoid leaks or malfunctions during the oil change.
To install the oil filter without problems:
- Align the filter threads carefully to avoid cross-threading.
- Turn the filter clockwise by hand until the gasket contacts the mounting surface.
- Tighten the filter an additional 3/4 to 1 full turn, following manufacturer torque specs if available.
- Avoid using tools to overtighten; hand-tight is usually sufficient.
- Double-check that the old gasket is removed to prevent double sealing.
Following these steps ensures a secure, leak-free oil filter installation.
Frequently Asked Questions
How Often Should I Change My Oil Filter?
You should change your oil filter every 3,000 to 7,500 miles, depending on your vehicle. Proper oil filter maintenance extends engine life.
Always recycle oil filters responsibly to prevent environmental contamination and comply with regulations.
What Type of Oil Filter Is Best for My Vehicle?
You should choose an oil filter based on oil filter comparison charts, prioritizing compatibility factors like thread size, filtration efficiency, and pressure ratings.
Always confirm it matches your vehicle’s specifications for optimal performance and durability.
Can I Reuse an Old Oil Filter?
Don’t dance with fire by reusing old oil filters; rebuilt filters might seem tempting, but reuse concerns include compromised seals and clogged media. For safety and engine health, always install a new, properly rated oil filter instead.
What Happens if I Overtighten the Oil Filter?
If you overtighten the oil filter, you risk damaging the gasket or filter housing, causing leaks or difficult removal. Avoid oil filter misconceptions by tightening to specs, and dispose of old filters properly to prevent environmental harm.
How Do I Dispose of Used Oil Filters Properly?
You dispose of used oil filters properly by draining them fully, placing them in a sealed container, and taking them to a recycling center.
Always follow safety considerations to prevent spills and environmental contamination during handling.
Conclusion
Now that you know the oil filter twists off counterclockwise, you’re ready to tackle the task with confidence. Think of it like unlocking a stubborn door—apply steady pressure and the right tools to avoid damage. Avoid common pitfalls, inspect the area thoroughly, and install the new filter snugly, turning it clockwise.
With these steps, you’ll keep your engine running smoothly and prevent leaks. Ensuring your maintenance is as precise as a well-oiled machine will help you know which way to turn oil filter every time.