How to Use Diehard Battery Charger
Choose the right Diehard battery charger for your battery’s voltage and chemistry, ensuring the output matches your battery’s amp-hour rating. Inspect the battery and place the charger on a stable surface.
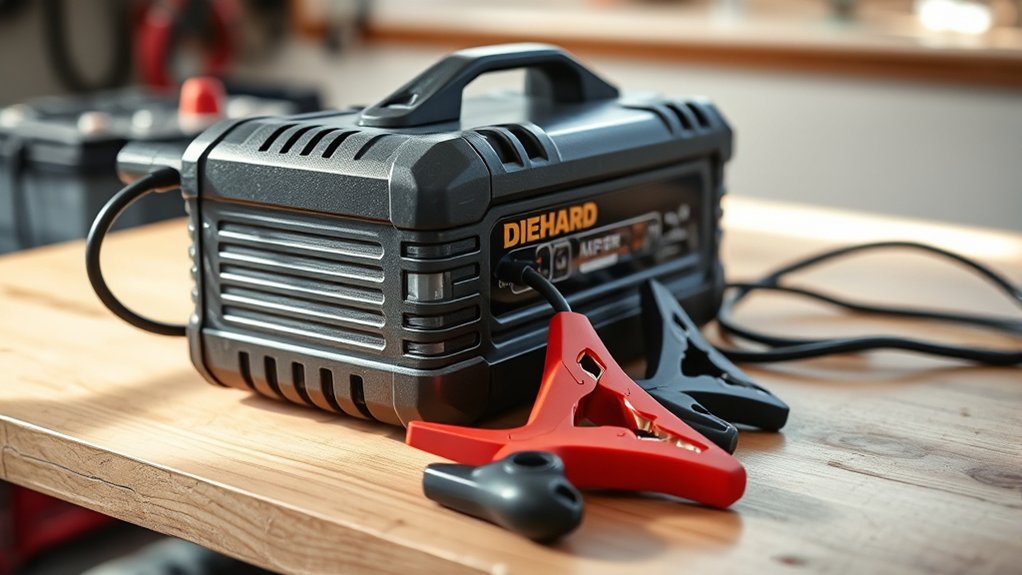
Connect the red clamp to the positive terminal and the black clamp to the negative terminal or ground with the charger unplugged. Select the correct charging mode and voltage settings.
Monitor the charging indicators and battery temperature carefully. When charging is complete, disconnect safely by removing the black clamp first.
Following this process carefully prevents damage and improves battery life. Further details explain troubleshooting and maintenance.
Key Takeaways
- Choose a Diehard charger matching your battery’s voltage, chemistry, and amp-hour rating for safe, effective charging.
- Connect red clamp to the positive terminal and black clamp to the negative terminal or chassis ground with charger unplugged.
- Select the correct charge mode (lead-acid, AGM, or gel) and adjust voltage settings to match your battery specifications.
- Monitor charging status via LED indicators and battery temperature, relying on automatic shut-off when fully charged.
- Disconnect safely by switching off, unplugging, then removing the black clamp before the red clamp.
Choose the Right Diehard Charger Model
Selecting the right Diehard charger model is essential for ensuring compatibility with your battery type and capacity. When choosing a model, first identify your battery’s voltage and chemistry, such as 12V lead-acid or AGM.
Next, verify the charger’s output current matches your battery’s amp-hour rating to avoid undercharging or overheating. Diehard offers models with varying amperage and charging modes; pick one that supports your specific battery technology for optimal performance.
Check for features like automatic voltage detection and multi-stage charging to enhance battery life. Avoid using a charger model incompatible with your battery’s specifications, as this can cause damage.
Prepare Battery and Charger Safely
Before connecting the Diehard charger, inspect the battery for cracks, leaks, or corrosion to ensure safe operation. Position the charger on a stable, dry surface and verify that all connections are clean and secure. Follow the manufacturer’s guidelines to set up the charger correctly before starting the charging process.
Inspect Battery Condition
How do you guarantee your battery is safe and ready for charging? Start by inspecting battery terminals for corrosion or damage, as these can impair charging efficiency. Next, check the battery case for cracks or bulges indicating internal faults.
Testing alternator output ensures the battery isn’t being overcharged or undercharged during operation, which could affect its condition.
| Inspection Task | What to Look For |
|---|---|
| Terminals | Corrosion, loose connections |
| Battery Case | Cracks, bulges, leaks |
| Alternator Testing | Voltage output 13.7–14.7V |
Perform these checks thoroughly before connecting the Diehard Battery Charger to avoid potential hazards or ineffective charging cycles.
Set Up Charger Properly
After confirming the battery’s condition and alternator output, you can proceed with setting up the Diehard Battery Charger. First, position the charger on a stable, non-conductive surface near the battery. Ensure the charger is unplugged before connecting clamps.
Attach the positive (red) clamp to the battery’s positive terminal, then the negative (black) clamp to the negative terminal or vehicle chassis ground. Avoid connecting clamps to unrelated topics like engine blocks or fuel lines to prevent hazards.
Next, plug in the charger and select the appropriate charging mode based on your two word discussion ideas such as “fast charge” or “trickle charge.” Never bypass safety steps; always wear protective gear and verify connections before powering the unit.
This precise setup ensures safe, effective charging without risks or damage.
Connect the Charger to Your Battery
Properly connecting the Diehard battery charger to your battery guarantees a safe and efficient charging process. First, ensure you follow all safety precautions: wear protective gear, avoid sparks, and work in a well-ventilated area.
Next, identify the positive (+) and negative (−) terminals on both the battery and charger.
| Step | Action |
|---|---|
| 1 | Attach red clamp to positive terminal |
| 2 | Attach black clamp to negative terminal |
| 3 | Verify clamps are secure and not touching |
| 4 | Ensure charger is unplugged before connection |
After connecting, double-check all connections to prevent short circuits. Once finished, you can proceed to set the charger controls.
Don’t forget to perform your cleanup routine once charging is complete to maintain safety and charger longevity.
Set the Charger Controls Correctly
You need to select the appropriate charge mode based on your battery’s condition. Next, adjust the voltage settings to match your battery’s specifications. Finally, set the charger to the correct battery type to ensure safe and efficient charging.
Selecting Appropriate Charge Mode
How do you determine the correct charge mode for your Diehard battery charger? Start by identifying your battery type: lead-acid, AGM, or gel. Each requires a specific charging profile, so selecting mode carefully guarantees optimal performance and longevity.
Refer to the charger’s manual to match the battery type with the appropriate mode. Always observe safety precautions: disconnect the battery from the vehicle, wear protective gear, and ensure good ventilation.
Use the mode selector switch or buttons on your charger to set the exact charge mode. Avoid forcing settings or guessing modes, as incorrect selection can cause battery damage or safety hazards.
Adjusting Voltage Settings
After selecting the correct charge mode, the next step involves adjusting the voltage settings to match your battery’s specifications. Proper voltage calibration ensures efficient charging and prevents damage. Follow these steps carefully, observing all safety precautions:
- Refer to your battery’s manual to identify the recommended voltage range.
- Power on the charger and access the voltage adjustment controls.
- Use the dial or buttons to set the voltage precisely within the specified range.
- Double-check the settings before connecting the battery to avoid overvoltage or undervoltage.
Always wear protective gear and ensure the charger is on a stable surface. Correct voltage calibration is critical to maintain battery health and ensure safe operation throughout the charging process.
Setting Battery Type
When selecting the correct battery type on your Diehard charger, which option corresponds precisely to your battery’s chemistry and specifications? Begin by identifying whether your battery is lead-acid, AGM, gel, or lithium-ion, as this directly affects charging parameters.
Access the charger’s control panel and use the selector switch or digital interface to set your battery type accordingly. Accurate selection ensures optimal charging voltage and current, preventing overcharging or undercharging.
This step is crucial for charging safety, protecting both the battery and the charger from damage. Always consult your battery’s datasheet if you’re unsure about its chemistry.
Avoid guessing, as mismatched settings can reduce battery lifespan and pose safety hazards. Properly setting the battery type guarantees efficient charging performance and reliable operation.
How to Monitor Charging and Stop on Time
Why is it essential to monitor your Diehard battery charger during the charging process? Monitoring ensures optimal battery health and charging safety by preventing overcharging and overheating. Here’s how you do it effectively:
- Observe the charger’s LED indicators or digital display for charging status updates.
- Check the battery temperature periodically to avoid overheating, which can damage battery cells.
- Use the charger’s built-in automatic shut-off feature to stop charging once the battery is full.
- Regularly inspect connections and cables for signs of wear or corrosion that could affect charging efficiency.
Disconnect the Charger Safely
To disconnect the Diehard battery charger safely, you need to follow a specific sequence that minimizes electrical hazards and protects both the charger and battery. First, switch off the charger and unplug it from the power source.
Next, carefully remove the negative (black) clamp from the battery terminal, followed by the positive (red) clamp. This order prevents sparks and short circuits. Avoid touching clamps together or to metal surfaces.
Proper disconnection reduces disposal hazards associated with damaged batteries or chargers. Always inspect cables for wear before storage. Dispose of any damaged components according to local regulations to limit environmental impact.
Following this procedure ensures both your safety and the longevity of your equipment.
Troubleshoot Common Diehard Charger Issues
How can you quickly identify and resolve common issues with your Diehard battery charger? Start by debunking Diehard myths that often lead to misuse and reduce charger longevity. Follow these steps:
- No Power Indicator: Check the power outlet and fuse; replace if faulty.
- Fails to Charge: Confirm all connections are secure and clean; corrosion disrupts current flow.
- Overheating: Ensure proper ventilation. Overheating signals internal faults needing professional service.
- Incorrect Charging Status: Reset the charger by unplugging and reconnecting to recalibrate sensors.
Maintain Your Car Battery After Charging
When should you perform routine maintenance on your car battery after charging? Ideally, conduct maintenance checks every three months or after extended periods of inactivity. Begin by inspecting the terminals for corrosion; clean them with a mixture of baking soda and water if needed.
Check the electrolyte levels if your battery is not sealed, and top up with distilled water to the recommended level. Use a voltmeter to measure the resting voltage, ensuring it stays above 12.4 volts.
Follow these maintenance tips to extend battery life and ensure reliable performance. For battery storage, keep it in a cool, dry place, fully charged, and disconnect it from the vehicle to prevent parasitic drain.
Regular maintenance will optimize your battery’s health and readiness for use.
Store and Care for Your Diehard Charger
Where should you keep your Diehard battery charger to maintain its functionality and extend its lifespan? Proper storage is essential. Follow these storage tips to ensure optimal performance and protect your warranty details:
- Store the charger in a cool, dry place away from direct sunlight and moisture to prevent internal damage.
- Keep the charger on a stable surface to avoid accidental falls or impacts that can affect its components.
- Disconnect all cables and wrap them neatly to prevent fraying or tangling.
- Avoid extreme temperatures; ideal storage is between 32°F and 104°F (0°C to 40°C) to maintain battery health.
Adhering to these guidelines preserves your charger’s integrity and keeps your warranty valid.
Frequently Asked Questions
Can Diehard Chargers Be Used for Motorcycle Batteries?
Yes, Diehard chargers support motorcycle compatibility and lithium ion support, so you can safely charge motorcycle batteries.
Just guarantee you select the correct mode for lithium ion or lead-acid types to optimize charging performance and battery health.
Are Diehard Battery Chargers Compatible With Lithium-Ion Batteries?
Oh, sure, because diehard lithium batteries and chargers were practically made for each other, right? In reality, you need to verify battery compatibility carefully; not all Diehard chargers support lithium-ion, so consult specs before connecting.
How Long Is the Warranty on Diehard Battery Chargers?
You’ll find Diehard battery chargers offer a warranty duration of typically one year. For battery compatibility and warranty duration specifics, always check the product manual or packaging to confirm coverage before use.
Can I Leave the Diehard Charger Connected Overnight?
You can leave the Diehard charger connected overnight, but ensure it’s designed for Diehard overnight use. Follow charging safety guidelines to prevent overcharging, overheating, or battery damage by monitoring the charger’s automatic shutoff feature and proper ventilation.
Do Diehard Chargers Have a Cold Weather Charging Mode?
Think of cold weather as a winter warrior; Diehard chargers include a cold weather charging mode to optimize battery maintenance. Use this mode to enhance performance and follow safety tips to prevent damage during low temperatures.
Conclusion
Now that you know how to use your Diehard battery charger, you’re equipped to keep your battery charged and ready to roar. Just like tuning a fine instrument, following each step precisely ensures smooth operation and longevity.
Always handle connections carefully, monitor charging closely, and maintain your battery afterward. With proper care and attention, your Diehard battery charger will serve you reliably, powering your vehicle like a well-oiled machine every time.