How to Test a Starter With Jumper Cables
To test your starter with jumper cables, first park your vehicle on level ground with the engine off and the parking brake set. This ensures safety and stability during the test.
Next, connect the red clamp to the dead battery’s positive terminal. Then, attach the other red clamp to the starter motor’s positive terminal.
After that, connect the black clamp to a grounded metal part of the vehicle—not the negative battery terminal. This helps prevent sparks and ensures proper grounding.
Finally, attempt to start the engine while observing for unusual noises or voltage drops below 9.6 volts. If problems continue, a professional diagnosis is recommended. More detailed steps and safety tips follow.
Preparing Your Vehicle and Jumper Cables
Before testing your starter with jumper cables, ensure your vehicle is parked on a level surface with the engine off and the parking brake engaged. This setup guarantees safety and stability during the procedure.
Next, inspect your jumper cables for any damage, such as frayed wires or corrosion, to prevent electrical hazards. Avoid mixing selected topics or unrelated ideas like battery charging or alternator testing at this stage; focus solely on preparing your vehicle and cables.
Gather the necessary tools in advance and wear protective gear to minimize risk. Proper preparation streamlines the testing process and reduces potential errors.
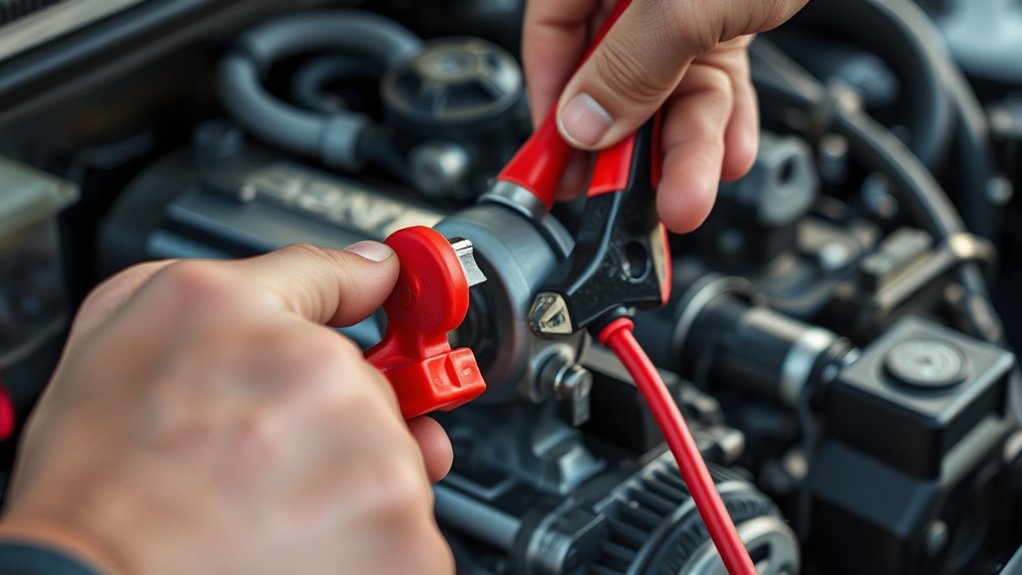
Where to Connect Jumper Cables to Test Your Starter
To test your starter with jumper cables, connect the positive (red) cable clamp directly to the positive terminal of the battery and the other end to the positive terminal on the starter motor.
Next, attach the negative (black) cable clamp to a solid ground point on the engine block or chassis, not the negative battery terminal. This guarantees a proper circuit and prevents sparks near the battery.
Avoid connecting jumper cables based on assumptions or unrelated topic distractions like image analysis of unrelated components. Focus solely on the starter motor’s terminals and reliable grounding points.
Proper connections are critical to isolate the starter for accurate testing and to prevent damage or injury. Misplacement of clamps compromises the test and could cause electrical shorts or false readings.
Step-by-Step Guide to Testing Your Starter With Jumper Cables
Properly connecting the jumper cables sets the foundation for accurately testing your starter. First, attach the positive (red) cable to the positive terminal on the dead battery, then connect the other end to the positive terminal on the good battery.
Next, attach the negative (black) cable to the negative terminal on the good battery, and connect the other end to a grounded metal part of the engine block on the dead vehicle. Once connected, attempt to start the engine.
If the starter engages, you’ve isolated the issue from battery health problems, essential before learning how to test alternator function. Remember, testing battery health is critical prior to this step. Never bypass proper connection, as electrical flow depends on it for accurate starter diagnostics.
How to Interpret Your Starter Test Results
Once you’ve recorded the voltage readings during your starter test, you need to analyze them carefully. Low voltage under load often indicates a weak starter or poor electrical connections. By comparing your results to standard voltage ranges, you can accurately diagnose whether the starter motor is faulty or if another issue is present.
Understanding Voltage Readings
How should you interpret the voltage readings obtained during your starter test? Understanding voltage is crucial for accurately assessing your starter’s condition. When you connect jumper cables and measure voltage at the starter terminals, a healthy battery should provide around 12.6 volts at rest.
During cranking, voltage typically drops but should remain above 9.6 volts. If the voltage falls significantly below this threshold, it indicates poor battery health or excessive voltage drop, affecting starter performance. Conversely, if the voltage remains steady yet the starter doesn’t engage, the issue likely lies elsewhere.
Always compare your readings against these benchmarks to differentiate between battery-related problems and starter faults, enabling precise troubleshooting without misdiagnosis.
Diagnosing Starter Issues
Why isn’t your starter engaging despite adequate voltage readings? This often signals internal starter faults or wiring issues rather than battery problems. After testing with jumper cables, interpret results carefully to avoid diagnostic pitfalls.
If voltage remains steady but the starter doesn’t turn, check for a faulty solenoid, worn brushes, or a seized motor. Intermittent engagement may indicate loose connections or corrosion.
Always consider safety considerations. Ensure the vehicle is in park or neutral, and avoid contact with moving parts while testing. Use insulated tools to prevent shorts.
Accurate interpretation hinges on eliminating external factors first, such as poor cable connections or blown fuses. By systematically analyzing these parameters, you can confidently pinpoint starter failures and avoid unnecessary replacements or repairs.
Common Mistakes When Testing Your Starter
Several common mistakes can undermine your efforts when testing a starter with jumper cables. Avoid drifting into unrelated topics or random discussion, which wastes time and clouds your focus.
Always ensure proper cable connections; loose or reversed clamps can cause false results or damage.
| Mistake | Consequence | Solution |
|---|---|---|
| Incorrect cable polarity | Starter won’t engage | Double-check clamp positions |
| Poor cable connection | No power flow | Clean clamps, secure tightly |
| Ignoring battery status | Misdiagnosis | Test battery voltage first |
| Random discussion | Confusion, delays | Stay focused on starter testing |
Stick to direct, stepwise testing to avoid errors and confirm accurate starter functionality.
What to Do If Your Starter Doesn’t Work
If your starter doesn’t respond after carefully checking connections and battery status, further troubleshooting is necessary. First, ensure battery safety by disconnecting the negative terminal before handling electrical components.
Next, verify the battery’s charge and condition, as a weak battery can mimic starter failure. Then, focus on these steps:
- Inspect the starter relay and fuses for continuity and replace if faulty.
- Test the solenoid by listening for a clicking sound when turning the key; absence indicates solenoid or wiring issues.
- Check the alternator’s function using a multimeter to confirm it’s charging the battery, as a failing alternator impacts starter performance.
When to Call a Mechanic for Starter Issues
If your starter shows signs like a clicking sound, no engine turnover, or intermittent operation, it’s time to contemplate professional help. You shouldn’t attempt complex repairs beyond basic testing with jumper cables. A mechanic can accurately diagnose and fix starter failures to prevent further damage.
Signs of Starter Failure
How can you tell when your starter is failing and requires professional attention? Monitoring start up timing and battery chemistry helps identify issues early. If your vehicle struggles or delays during ignition, it signals starter malfunction.
1. Delayed Engine Crank
A slow or labored crank often means the starter isn’t engaging properly, despite the battery chemistry being healthy.
2. Clicking Noise
Repeated clicking without engine turnover suggests the starter solenoid is failing to transmit power efficiently.
3. Intermittent Starting
If your car starts sometimes but not consistently, it points toward internal starter wear or electrical faults.
Recognizing these signs lets you address starter failure promptly, preventing complete breakdown and costly repairs.
When Professional Help Needed
When should you call a mechanic for starter issues? If your vehicle shows persistent signs of starter failure despite jump start attempts, it’s time to seek professional help. Complex electrical faults, worn-out starter solenoids, or internal motor damage require expert diagnostics and repair.
Prioritize starter safety; improper handling can cause electrical shorts or battery damage. Additionally, be aware of jump start legality in your area, as some jurisdictions restrict or regulate this practice.
If you experience unusual noises, burning smells, or the engine fails to crank after multiple jump starts, avoid further attempts to prevent damage. A certified mechanic can accurately diagnose underlying issues, ensuring safe and effective starter repair or replacement.
Trust professional intervention to maintain vehicle reliability and comply with safety regulations.
Frequently Asked Questions
Can Jumper Cables Damage My Vehicle’s Electrical System?
Jumper cables can spark trouble if misused, potentially damaging your vehicle’s electrical system. To prevent starter wear and electrical harm, always follow strict safety precautions, ensuring correct polarity and secure connections during testing or jump-starting.
How Long Should I Wait Between Starter Tests?
You should wait at least 2-3 minutes between starter tests to prevent overheating.
Follow the testing procedure carefully and observe safety precautions to avoid electrical damage or personal injury during each interval.
Are There Alternative Methods to Test a Starter?
They say, “Don’t put all your eggs in one basket.” For starter testing, you can use a multimeter to check voltage or perform a bench test as alternative methods. These approaches ensure accurate diagnosis without jumper cables.
Can a Weak Battery Affect Starter Test Results?
Yes, a weak battery can cause a voltage drop, reducing starter output and skewing test results.
You’ll need a jump start or fully charged battery to guarantee accurate starter testing and eliminate battery-related issues.
Is It Safe to Test a Starter in Cold Weather?
Cold weather can be a double-edged sword for testing starters. You should ensure battery health is optimal before testing, as low temperatures reduce battery efficiency, potentially skewing results and risking starter or battery damage during the test.