How to Read a Schumacher Battery Charger
To read your Schumacher battery charger, start by checking the display lights. A steady green light means the battery is fully charged, while an amber light indicates that charging is in progress. A blinking red light signals a fault such as low voltage or a poor connection.
Next, monitor the voltage and current readings to ensure they remain within safe limits. Use the mode selector to choose the correct setting for your battery type. Adjust the amperage to control the charging speed.
Watch the diagnostic indicators carefully to maintain the health of your battery. Understanding these basics will help you master the full functionality of your Schumacher battery charger.
Key Takeaways
- Check the charger display for voltage, current, and battery capacity readings to monitor charging progress and avoid overcharging.
- Interpret steady green light as full charge, blinking red as a fault or poor connection, and amber/yellow as active charging or maintenance mode.
- Use the mode selector to choose the correct charging mode based on battery type and capacity before starting the charge.
- Monitor diagnostic indicators and error lights to detect issues like low battery voltage, reverse polarity, or charger overload.
- Confirm all connections are secure and watch for abnormal heat or swelling during charging to ensure battery safety.
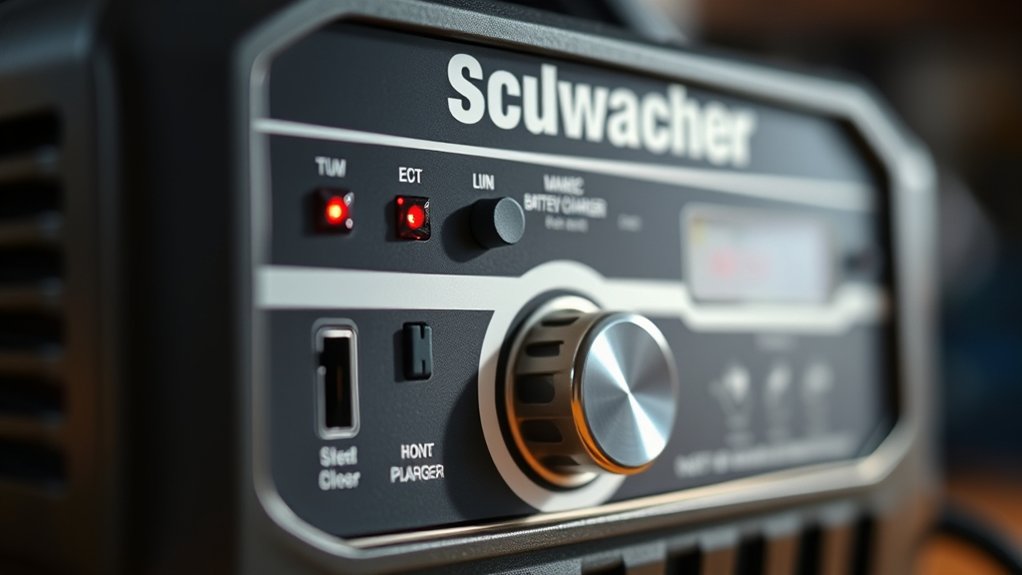
How to Read Your Charger’s Display Lights
Understanding how to read your Schumacher charger’s display lights is essential for monitoring the charging process accurately. The display lights indicate the battery’s charging status, including readiness, charging, and full charge.
When the charging light is on, you’re actively charging the battery, and the full charge light signals completion. Pay close attention to blinking or error lights, which indicate issues such as poor connections or low battery voltage.
Properly reading capacity through the display helps you avoid overcharging or undercharging. Always follow safety practices by disconnecting the charger before handling the battery and ensuring the charger is compatible with your battery type.
Understanding Charging Modes and Settings
How do you select the right charging mode on your Schumacher battery charger? Understanding charging modes is essential for optimal performance and battery longevity.
First, identify your battery type and capacity. Then, follow these steps:
Begin by determining your battery’s type and capacity before proceeding with the charging steps.
- Choose the appropriate charging mode: standard, quick, or maintenance, based on your battery’s condition and usage.
- Set the correct voltage and amperage as indicated in your battery’s specifications.
- Engage safety considerations by ensuring proper ventilation and avoiding overcharging.
- Confirm all connections are secure before starting the charging process.
Each mode tailors the current flow and duration to suit different batteries, preventing damage. By precisely selecting the mode and settings, you’ll maximize efficiency while safeguarding your battery and charger.
Interpreting Charging Status and Battery Condition Lights
Once you’ve selected the proper charging mode and set the correct parameters, monitoring the charger’s status lights becomes your next step. Pay close attention to the interpretation nuances of each LED indicator: a steady green light typically signals a fully charged battery, while a blinking red may indicate a fault or improper connection.
Some models include amber or yellow lights to denote charging in progress or maintenance modes. These visual cues provide real-time feedback on battery condition and charging status, essential for safe operation. Your user interactions should focus on verifying these signals before proceeding, ensuring the battery is neither overcharged nor undercharged.
Understanding these lights prevents damage and optimizes battery lifespan, making your monitoring precise and effective.
Using Buttons and Controls Step-by-Step
Where do you begin when operating the Schumacher battery charger’s interface? Start by familiarizing yourself with the buttons and controls designed for precise battery management. Follow these steps for effective use:
- Press the power button to activate the charger and display the current battery health status.
- Use the mode selector to choose the appropriate charging mode based on your battery type.
- Monitor the troubleshooting indicators to identify any irregularities during the charging process.
- Adjust the amperage setting if necessary to control the charge rate, ensuring optimal battery conditioning.
Troubleshooting Error Codes and Issues
When your Schumacher charger displays an error code, first identify its meaning using the manual or display indicators. If the charger malfunctions, reset it by disconnecting and reconnecting the power source. Then, systematically diagnose charging issues by checking battery connections, voltage levels, and charger settings.
Common Error Code Meanings
How do you identify and address common error codes on a Schumacher battery charger? First, ensure the display readability is clear to accurately interpret the codes. Common error codes indicate specific issues requiring prompt attention. Here’s what to look for:
- Error 1 (Battery Voltage Low) Check battery connections and voltage; weak batteries may need replacement.
- Error 2 (Reverse Polarity) Confirm clamps are connected correctly; red to positive, black to negative.
- Error 3 (Battery Temperature Out of Range) Move the charger to a cooler area or allow the battery to cool.
- Error 4 (Charger Overload) Reduce load or disconnect other devices to prevent overheating.
Recognizing these common errors helps maintain charger function and battery health efficiently.
Resetting The Charger
Why does your Schumacher battery charger sometimes display persistent error codes even after correcting the issue? The answer lies in the charger’s internal memory, which may retain fault status until you reset it.
Resetting the charger through power cycling clears stored errors and restores normal operation. To do this, disconnect the charger from power and battery, wait 30 seconds, then reconnect.
| Step | Action |
|---|---|
| 1 | Disconnect charger from power |
| 2 | Remove battery connection |
| 3 | Wait 30 seconds |
| 4 | Reconnect power and battery |
Following this procedure ensures the charger reboots properly and error codes clear, allowing it to resume accurate monitoring and charging. Always perform resetting the charger before further troubleshooting.
Diagnosing Charging Problems
Where should you start if your Schumacher battery charger displays an error code or fails to charge properly? Begin with a systematic approach to diagnosing charging problems. Use these two word discussion ideas to guide you:
- Check Connections: Ensure clamps are clean, tight, and correctly attached to battery terminals.
- Inspect Battery: Verify the battery voltage and condition; a severely discharged or damaged battery may trigger errors.
- Review Error Codes: Consult the charger manual to interpret displayed codes precisely; each code indicates specific issues.
- Reset Charger: Power down and unplug the unit to clear faults, then restart to test if the problem persists.
Following this methodical process helps you accurately troubleshoot battery charging issues and ensures safe, effective operation.
Maintaining Your Battery With Schumacher Charger Features
You’ll start by interpreting the charger’s indicator lights to track charging status accurately. Next, activate the maintenance mode to prolong battery life without overcharging. Throughout the process, monitor battery health metrics displayed to ensure optimal performance.
Understanding Charger Indicator Lights
Indicator lights on a Schumacher battery charger provide essential information about the charging process and battery status. To guarantee charger safety and proper operation, familiarize yourself with the display legend printed on the charger.
Here’s how to interpret the key indicator lights:
- Power On: Confirms the charger is connected to a power source.
- Charging: Indicates the battery is actively receiving charge.
- Fully Charged: Signals the battery has reached optimal charge level.
- Fault/Error: Alerts you to issues such as poor connection or incompatible battery type.
Utilizing Maintenance Mode Settings
After recognizing the charger’s indicator lights and their meanings, it’s important to utilize the maintenance mode settings to extend your battery’s lifespan. Maintenance mode on your Schumacher charger delivers a low, steady charge that prevents overcharging while keeping the battery at optimal capacity.
To activate it, connect the charger to the battery, then select the maintenance mode setting as indicated on the control panel. This mode constantly monitors voltage and adjusts output to maintain battery health.
Always ensure proper ventilation and follow safety guidelines to maximize battery safety during extended charging periods. Using maintenance mode regularly helps avoid sulfation and premature battery failure, making it essential for long-term battery care.
Monitoring Battery Health During Charging
How can you ensure your battery remains in prime condition throughout the charging process? Effective monitoring health during charging is essential. Your Schumacher charger provides clear charging indicators to help you track this. Follow these steps:
- Observe the LED or digital display for charging status. Steady or blinking lights signal different phases.
- Check voltage and current readings regularly to confirm they stay within recommended limits.
- Use the charger’s diagnostic mode, if available, to assess battery condition before and during charging.
- Watch for abnormal heat or swelling, which can indicate battery distress despite normal charging indicators.
Frequently Asked Questions
What Types of Batteries Are Compatible With Schumacher Chargers?
You’ll find Schumacher chargers compatible with lead-acid, AGM, and gel batteries, ensuring broad charging compatibility. Their advanced safety features protect against overcharging, reverse polarity, and short circuits, keeping your batteries safe and extending their lifespan efficiently.
Can Schumacher Chargers Be Used Outdoors Safely?
Of course, you can treat your charger like a raincoat, just don’t. For outdoor safety, Schumacher chargers require weatherproofing considerations; use them in dry, sheltered areas to avoid moisture damage and ensure optimal, safe performance during charging sessions.
How Long Does a Full Charge Typically Take?
A full charge typically takes 4 to 24 hours, depending on battery size and charger settings.
Expect longer charging times in colder temperatures, as temperature impact slows chemical reactions, reducing charging efficiency and speed.
Are Schumacher Chargers Suitable for Deep-Cycle Batteries?
Wondering if Schumacher chargers suit deep-cycle batteries? Yes, they do. When discussing two word features like “smart charging,” you’ll appreciate their precise voltage control, unlike an unrelated topic like “solar panels,” ensuring safe, efficient deep-cycle charging.
Do Schumacher Chargers Have Built-In Safety Features?
Yes, Schumacher chargers have built-in safety features including temperature monitoring. You’ll benefit from automatic shutoff and overcharge protection, ensuring safe battery charging while preventing damage caused by overheating or excessive current flow during the process.
Conclusion
Now that you’ve mastered reading your Schumacher battery charger, you’re basically a tech wizard—minus the robes. Just remember, those blinking lights aren’t secret alien signals; they’re your charger’s way of talking. Follow the charging modes like a pro, heed error codes without panic, and use the controls with surgical precision.
Keep your battery happy, and it’ll thank you by not leaving you stranded. Who knew charging could be this thrilling? With these tips, reading a Schumacher battery charger becomes second nature, making your charging experience smooth and efficient.