How to Connect Car Battery Charger
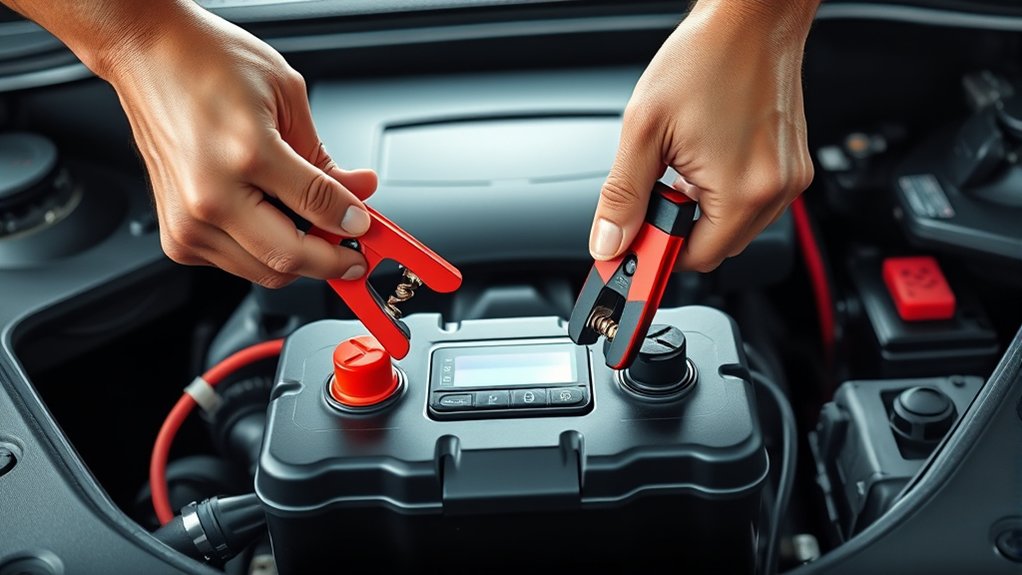
To connect your car battery charger safely, first turn off both the charger and vehicle ignition. This ensures no electrical current flows during the initial setup. Attach the red clamp securely to the battery’s positive terminal.
Next, connect the black clamp to a clean, unpainted metal surface away from the battery. This helps prevent sparks and ensures a good ground connection. Confirm all connections are firm and double-check polarity to avoid damage.
Once the clamps are secure, you can power on the charger and monitor voltage and current to ensure proper charging. Find out how to prepare, monitor, and disconnect your charger correctly for best results.
How to Safely Connect a Car Battery Charger
How do you guarantee a safe connection when attaching a car battery charger? First, ensure your charger and battery specifications match to prevent damage. Avoid unrelated topic distractions or off topic ideas that can lead to mistakes.
Begin by turning off the charger and vehicle ignition. Connect the positive (red) clamp to the battery’s positive terminal securely. Then, attach the negative (black) clamp to a clean, unpainted metal surface on the vehicle’s frame, away from the battery and fuel system, to prevent sparks.
Make sure clamps have firm contact without slipping. Double-check connections before powering on the charger. Following these precise steps reduces risks of electrical shorts or hazards, ensuring a safe and effective charging process every time you connect your car battery charger.
Prepare Safety Gear Before Charging Your Battery
Before you start charging, put on essential protective equipment like safety goggles and gloves to shield yourself from acid splashes and sparks. Choose clothing made of non-flammable materials that fully covers your skin to prevent injury. Proper safety gear minimizes risks during the charging process.
Essential Protective Equipment
Why should you prioritize protective equipment when charging your car battery? Battery safety is crucial because batteries emit harmful gases and contain corrosive acid that can cause serious injury.
Before you start, always wear safety goggles to protect your eyes from acid splashes or sparks. Use acid-resistant gloves to shield your hands from corrosive materials and prevent skin contact. A face shield adds an extra layer of protection against unexpected splashes.
Ensure you have a fire-resistant apron or coveralls to guard against acid spills. Proper protective equipment minimizes the risk of chemical burns, eye damage, and electrical shock.
Safe Clothing Choices
A well-chosen set of clothing is essential to protect you from acid splashes and electrical hazards while charging your car battery. Always wear garments made from safe fabrics like cotton or wool, which resist sparks and minimize static buildup. Avoid synthetic materials that can melt or ignite easily.
Additionally, wear long sleeves and pants to cover your skin thoroughly. Don’t use regular footwear if it lacks insulation; opt for rubber-soled shoes to prevent electrical conduction.
Below is a quick guide to safe clothing choices:
| Clothing Item | Recommended Material | Safety Feature |
|---|---|---|
| Shirt | Cotton/Wool | Flame-resistant |
| Pants | Cotton/Wool | Acid splash protection |
| Footwear | Rubber-soled | Electrical insulation |
| Gloves | Rubber | Acid and electric barrier |
| Eye Protection | Safety goggles | Shield from splashes |
Identify Your Car Battery and Charger Types
To correctly connect your car battery charger, you need to identify the specific type of battery installed in your vehicle as well as the charger model you have. Recognizing battery types and charger compatibility ensures safe and efficient charging.
Properly connecting your car battery charger starts with identifying your battery type and charger model for safe, efficient charging.
Start by checking the battery label for:
- Battery chemistry (Lead-Acid, AGM, Gel, Lithium-Ion)
- Voltage rating (commonly 12V for cars)
- Cold Cranking Amps (CCA) indicating capacity
Next, verify your charger’s specifications:
- Supported battery chemistries
- Output voltage and amperage
- Automatic vs. manual charging modes
- Safety features like reverse polarity protection
Matching the charger to your battery type prevents damage and optimizes charging performance. Always consult both manuals to confirm compatibility before connecting.
How to Prepare Your Car Battery for Charging
Before you start charging, always wear protective gear and ensure the area is well-ventilated to prevent hazards. Next, inspect the battery for cracks, leaks, or corrosion on the terminals. Address any issues to avoid damage or safety risks during charging.
Safety Precautions First
Although connecting a car battery charger seems straightforward, you must prioritize safety precautions to prevent injury or damage. Establishing a safety culture and conducting a thorough risk assessment are essential before proceeding.
Always operate in a well-ventilated area to avoid gas accumulation. Wear protective gear, including gloves and safety goggles, to shield against acid splashes.
Ensure the charger is unplugged before connecting or disconnecting cables to prevent sparks. Finally, keep flames and sparks away from the battery to reduce explosion risks.
Follow these key safety measures:
- Conduct a risk assessment to identify potential hazards.
- Maintain a safety culture by adhering to best practices.
- Use personal protective equipment (PPE) consistently.
- Disconnect charger power before cable handling.
These steps minimize risks and ensure safe charging operations.
Inspect Battery Condition
Battery inspection lays the foundation for safe and effective charging. Begin by assessing corrosion on the battery terminals and cable connectors. Use a wire brush or battery terminal cleaner to remove any buildup, ensuring a solid electrical connection.
Next, visually inspect the battery case for cracks, bulges, or leaks, which indicate damage and require replacement. Then, evaluate cold cranking ampacity (CCA) to determine if the battery can deliver adequate power for starting the engine in low temperatures.
Use a battery tester to measure the CCA against the manufacturer’s specifications. If the CCA falls significantly below the recommended value, charging may not restore full functionality, and replacement is advisable. Thorough inspection minimizes risks and ensures the charger operates efficiently.
Step-by-Step Guide to Connecting Your Car Battery Charger
How exactly do you connect your car battery charger to guarantee a safe and effective charge? Begin by reviewing the car battery foundations: identify the positive (+) and negative (–) terminals clearly. Follow proper charging etiquette to avoid sparks or damage.
- Turn off the vehicle and charger before connecting.
- Attach the red clamp to the positive terminal first.
- Connect the black clamp to the negative terminal or a grounded metal part away from the battery.
- Ensure clamps are secure and contacts are clean to maintain optimal conductivity.
This step-by-step connection ensures safe current flow and protects both you and the battery. Always handle clamps carefully to prevent short circuits, keeping the charging process controlled and efficient.
How to Set Charger Voltage and Mode Correctly
Once you’ve securely connected the charger clamps, the next step is to adjust the charger settings to match your battery’s requirements. First, determine the correct voltage range, commonly 12V or 24V, based on your battery specifications. Then, select the appropriate charging mode: trickle, fast, or maintenance. Proper mode selection ensures efficient charging without damaging the battery.
| Battery Type | Voltage Range (V) | Mode Selection |
|---|---|---|
| Lead-Acid | 12 | Trickle / Fast |
| AGM | 12 | Maintenance / Fast |
| Deep Cycle | 12 or 24 | Maintenance / Trickle |
Always verify these settings before powering on the charger to prevent overcharging or undercharging.
How to Monitor Charging and Disconnect Your Charger
Monitoring the charging process closely guarantees your battery receives the correct amount of power without risking damage. To know how to charge safely, keep an eye on the charger’s display or indicator lights, ensuring voltage and current remain within recommended limits.
Check the battery temperature to prevent overheating, a critical aspect of battery maintenance. When the charger signals full charge or the current drops significantly, it’s time to disconnect.
Follow these steps for precise monitoring and safe disconnection:
- Regularly inspect charger readings for abnormal fluctuations
- Ensure the battery remains cool to the touch
- Disconnect the charger by first turning it off, then removing clamps
- Store the charger properly after use to maintain its longevity
This careful approach ensures efficient charging and extends your battery’s lifespan.
Frequently Asked Questions
Can I Charge a Frozen Car Battery Safely?
You can’t safely charge a frozen battery; safety precautions demand thawing first. Understanding battery chemistry, ice disrupts internal reactions.
Treat it like a delicate 18th-century clock. Freeze damages delicate parts, risking leaks or explosions during charging.
How Long Does a Typical Car Battery Charging Take?
A typical car battery charging takes about 4 to 24 hours, depending on charger type and battery capacity.
Use a smart charger and monitor voltage levels to ensure ideal charging and prevent overcharging or damage.
What Are the Signs of a Faulty Car Battery Charger?
Over 30% of charging failures stem from faulty charger symptoms like inconsistent charging, overheating, or unusual noises. Watch charger safety indicators such as blinking lights or error codes to identify a faulty charger and prevent battery damage effectively.
Can I Charge a Lithium-Ion Car Battery With a Standard Charger?
You can’t charge a lithium-ion car battery with a standard charger unless it has lithium compatibility. Always verify charger safety features to prevent overcharging, overheating, or damage.
Ensure the charger provides proper voltage and current settings for lithium batteries.
Is It Safe to Leave the Charger Connected Overnight?
You shouldn’t leave the charger connected overnight unless it has an automatic shut-off or maintenance mode. Prioritize battery safety by preventing overcharging, which can damage the battery and create hazardous conditions during overnight charging.