How to Find a Coolant Leak
To find a coolant leak, start by checking for sweet smells or visible puddles under your vehicle.
Inspect hoses, clamps, radiator, and water pump for cracks, stains, or wetness.
Monitor your coolant level and color in the reservoir.
Consider using UV dye and a flashlight to spot hidden leaks.
Don’t forget to examine the heater core area for dampness.
Identifying leaks early can prevent overheating and costly repairs.
There’s more detailed guidance to help you pinpoint and fix leaks effectively.
Signs of a Coolant Leak
How can you tell if your vehicle has a coolant leak? First, monitor for a sweet, irritating smell near the engine bay, which typically indicates leaking antifreeze.
Next, check the engine performance; a coolant leak often causes the engine to overheat, leading to reduced efficiency or unexpected shutdowns. You might also notice visible puddles of fluorescent green, orange, or pink fluid beneath your vehicle.
Keep an eye on the temperature gauge. If it rises above normal levels, a coolant leak may be the culprit. Additionally, steam or white smoke emitting from under the hood signals boiling coolant escaping.
Address these signs immediately, as ignoring them can cause severe engine damage and costly repairs. Staying alert to these symptoms helps you prevent major mechanical failures.
Priority Areas to Inspect for Coolant Leaks
Where should you focus your inspection when tracking down a coolant leak? Concentrate on critical points where leaks commonly occur to save time and effort. For novice explanations, understanding these priority areas helps you diagnose issues effectively without guesswork.
Also, maintain awareness of battery maintenance, since corrosion or fluid leaks near the battery can sometimes be mistaken for coolant leaks.
Key areas to inspect include:
- Radiator and radiator hoses: Check for cracks, loose clamps, or wet spots.
- Water pump: Look for seepage around the pump’s gasket or weep hole.
- Heater core and hoses: Inspect inside the cabin for damp carpets or sweet-smelling odors.
Focusing on these components ensures you detect coolant leaks precisely and avoid unnecessary repairs.
Checking Coolant Levels and Color for Leak Signs
Start by inspecting the coolant reservoir to check the fluid level against the marked indicators. Pay close attention to the coolant color; any cloudiness or rust can signal contamination or leaks. Track changes in coolant levels over time to identify slow leaks before they cause major issues.
Inspect Coolant Reservoir
When inspecting the coolant reservoir, pay close attention to both the fluid level and its color, as these indicators can reveal potential leaks or contamination. Begin reservoir inspection by ensuring the coolant level sits between the “MIN” and “MAX” marks; levels below “MIN” often signify leaks or system loss.
Examine the reservoir itself for cracks, bulges, or discoloration that might suggest degradation or external damage. Also, check the reservoir cap for secure fitting and intact seals to prevent pressure loss.
Key points during reservoir inspection:
- Confirm fluid level is within recommended range.
- Inspect reservoir body for physical damage or signs of leaks.
- Verify cap integrity and proper sealing to maintain system pressure.
Consistent reservoir inspection is crucial for early leak detection and optimal cooling system performance.
Evaluate Coolant Color
How can you determine if your coolant is signaling a leak or contamination? Begin by performing a color comparison between the coolant in your reservoir and the manufacturer’s recommended hue.
Coolants typically come in distinct colors: green, orange, pink, or blue, each indicating different chemical compositions. If you notice a shift, such as cloudiness, rust, or an unusual brownish tint, contamination or internal corrosion may be present.
Additionally, some systems use dye alternatives that fluoresce under UV light, making it easier to detect leaks invisible to the naked eye. Using a UV lamp, you can identify the presence of dye in areas where coolant shouldn’t be, confirming a leak.
Regularly evaluating the coolant color helps you diagnose issues early and maintain system integrity.
Monitor Coolant Level Changes
Why do coolant levels fluctuate unexpectedly? Monitoring these changes is essential for finding coolant iconography that signals leaks or system issues. Check the reservoir regularly with the engine cold to get accurate readings.
Pay attention to colorimetric indicators. Coolant color shifts can reveal contamination or deterioration.
To effectively monitor coolant level changes:
- Note consistent drops in the reservoir level without visible puddles.
- Observe any abnormal color changes using colorimetric indicators.
- Recognize the coolant iconography on the reservoir to ensure proper fill levels.
Inspecting Hoses and Clamps for Coolant Leak Damage
Although coolant leaks can originate from various sources, hoses and clamps are common culprits that require close inspection. Start by visually examining each coolant hose for cracks, bulges, or soft spots, which indicate material degradation.
Pay particular attention to areas near bends or connections, as these endure the most stress. Next, check clamps for signs of clamp wear such as corrosion, looseness, or deformation. Use a screwdriver or appropriate tool to gently tighten clamps; if they don’t hold tension, replace them.
Leaks often occur where the hose meets the fitting, so ensure a secure, leak-free seal. Don’t overlook hidden or hard-to-reach hoses; carefully trace lines for fluid residue or dampness. Thoroughly inspecting hoses and clamps helps you pinpoint leaks early, preventing coolant loss and engine damage.
Examining the Radiator and Cap for Leaks
Start by closely inspecting the radiator surface for any cracks or corrosion that could cause leaks. Next, remove and examine the radiator cap, checking the seal for wear or damage. Finally, look for any coolant residue around the cap and radiator, which often indicates a leak.
Inspect Radiator Surface
A thorough inspection of the radiator surface is essential when diagnosing a coolant leak. You’ll want to carefully examine the metal and plastic surfaces for cracks, corrosion, or pitting that can compromise the radiator’s integrity.
Since coolant properties affect its behavior under heat, leaks often appear where the boiling point is exceeded due to compromised surfaces. Focus on areas where coolant tends to pool or leave residue.
Key inspection points include:
- Surface cracks or corrosion around the radiator core and tanks
- Signs of dried coolant deposits, often white or greenish stains
- Loose or damaged fittings and hose connections
These indicators help pinpoint leaks caused by material fatigue or chemical breakdown, ensuring you address the root cause without overlooking subtle but critical damage.
Check Radiator Cap Seal
Once you’ve examined the radiator surface for damage, turn your attention to the radiator cap and its seal. Start by removing the cap carefully when the engine is cool. Inspecting seals is essential here; look for cracks, brittleness, or deformation on the rubber gasket.
Any compromise in the seal can cause pressure loss, leading to coolant leaks. Clean the sealing surface on both the cap and radiator neck to guarantee a proper fit. When reinstalling, apply firm cap tightening without over-torquing, which could damage the seal or threads.
Proper cap tightening maintains system pressure and prevents coolant from escaping. If the seal shows wear or damage, replace the cap immediately to restore the cooling system’s integrity and avoid ongoing leaks.
Look for Coolant Residue
Where should you focus your attention when searching for signs of a coolant leak? Start by examining the radiator and its cap closely for any visible coolant residue. Coolant often leaves behind a distinct stain or crusty buildup where it’s escaping.
To enhance detection, use color tests or dye tracing methods by adding a fluorescent dye to the coolant system; this makes leaks easier to spot under UV light. Pay particular attention to:
- Edges and threads of the radiator cap
- Seams and joints on the radiator surface
- Hoses connected near the radiator
These areas often show telltale signs of leakage. Precise inspection combined with dye tracing can help pinpoint even small, slow leaks that might otherwise go unnoticed.
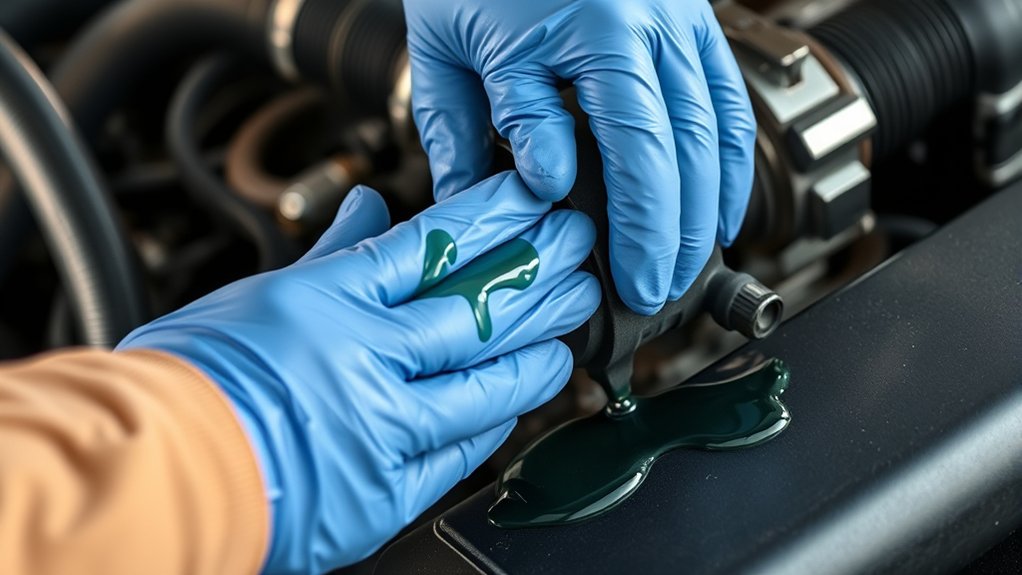
Checking if Your Water Pump Is Leaking Coolant
Although water pumps are designed to operate seamlessly, they can develop leaks that compromise your cooling system’s efficiency. To check if your water pump is leaking coolant, inspect the area around the coolant pump housing and the weep hole.
Look for coolant residue or wetness, especially near the pulley and gasket.
Use this table to guide your inspection:
| Location | What to Look For |
|---|---|
| Coolant Pump Seal | Moisture or crusted fluid |
| Weep Hole | Dripping or dampness |
| Pulley Area | Corrosion or coolant stains |
If you observe any signs, it indicates a potential water pump failure. Addressing leaks early prevents overheating and costly repairs.
Finding Hidden Coolant Leaks With UV Dye
How can you detect coolant leaks that aren’t visible to the naked eye? Using a color change dye specially formulated for coolant systems allows you to locate hidden leaks effectively. Add the dye to your coolant reservoir and run the engine to circulate it thoroughly.
Then, use UV flashlight detection to inspect the engine bay and radiator area in a dark environment. The dye fluoresces under UV light, revealing even the smallest leaks.
Key points to remember:
- Use a UV flashlight for precise leak location.
- Apply the color change dye as per product instructions.
- Inspect all hoses, joints, and the radiator carefully.
This method provides a practical, non-invasive way to identify elusive leaks before they cause major damage.
Pressure Testing Your Cooling System for Leaks
Before pressure testing, make sure your cooling system is cool and the radiator cap is removed to relieve pressure. Attach the pressure tester securely to the radiator or coolant reservoir and pump it to the recommended pressure level. Watch closely for any drop in pressure and inspect all hoses, connections, and components for visible leaks.
Preparing The Cooling System
When should you perform a pressure test on your cooling system? You should do it whenever you suspect a leak or notice overheating. Proper preparation ensures accurate results and protects your vehicle’s components.
Before testing, make sure to:
- Allow the engine to cool completely to avoid injury and inaccurate pressure readings.
- Check coolant levels and top off with the correct mixture to maintain optimal driving safety and fuel efficiency.
- Inspect hoses and clamps for visible damage to prevent false positives during the test.
Using A Pressure Tester
Why use a pressure tester to check your cooling system? It provides a controlled, reliable method to detect leaks by pressurizing the system to its operating limits without running the engine. This approach reveals leaks that might remain hidden during normal operation.
In practical demonstrations, pressure testers expose weak points like hoses, gaskets, and radiator seals. A common misconception is that visual inspection alone suffices, but many leaks only appear under pressure.
To use the tester, first ensure the engine is cool, then attach the tester to the radiator or coolant reservoir cap. Pump until you reach the recommended pressure, observing the gauge for drops.
If pressure falls, inspect for visible leaks or listen for escaping air. This method saves time and prevents unnecessary part replacements.
Identifying Leak Locations
How do you pinpoint the exact source of a coolant leak once your system is pressurized? Start by carefully inspecting common weak points influenced by engine design and coolant formulation. The pressure tester forces coolant out where seals, hoses, or components fail, making leaks visible.
Focus on areas where the system experiences mechanical stress or chemical degradation due to the coolant’s properties.
Look closely at these critical spots:
- Radiator seams and core, vulnerable due to thermal cycling and coolant composition
- Hose connections and clamps, often loosened by engine vibration or coolant acidity
- Water pump housing and gaskets, which endure constant pressure and vary by engine design
Inspecting the Heater Core for Coolant Leaks
Where should you look if you suspect a coolant leak inside the vehicle cabin? The heater core is a common source. It functions as a small radiator, circulating hot coolant to provide heat.
To inspect it, first check under the dashboard for damp carpet or a sweet smell, which indicates coolant seepage. Next, examine the heater core hoses for cracks or loose clamps that disrupt coolant flow.
You can also remove the glove box to visually inspect the core for corrosion or leaks. Run the engine and activate the heater to observe if coolant drips or puddles appear beneath the core.
Any signs of moisture confirm a leak, meaning the heater core is compromised and requires repair or replacement to maintain proper coolant flow and cabin heating.
When to Call a Mechanic for Coolant Leak Repair
When should you call a mechanic for a coolant leak repair? If you notice persistent coolant loss or overheating despite your efforts, it’s time to seek professional help.
Mechanics have the tools and expertise to accurately diagnose and fix leaks that aren’t visible or accessible to you. Consider calling a mechanic if you observe:
- Rapid coolant drops or unexplained puddles under your vehicle
- Warning lights related to engine temperature or coolant level
- Signs of coolant contamination in oil or exhaust emissions
Ignoring these signs can escalate damage and repair costs. Just as a creative sponsorship and social media strategy require expert input to maximize impact, effective coolant leak repairs demand professional precision.
Don’t risk a DIY fix when a mechanic can ensure your vehicle’s longevity and safety.
Preventing Coolant Leaks With Regular Maintenance
To keep it from leaking, don’t wait for a seepage to show up. Prevent it with regular maintenance. Begin by arranging periodic inspections to identify wear on hoses, clamps, and the radiator before they fail.
Track the aging coolant effects carefully, since degraded coolant loses its corrosion inhibitors. This raises the chance of leaks and system damage. Flush and replace coolant according to your vehicle’s specifications to maintain the best chemical balance.
Integrate maintenance budgeting into your routine to allocate funds for timely parts replacement and fluid changes, avoiding costly emergency repairs. Use manufacturer-recommended products and keep proper coolant levels consistently.
Frequently Asked Questions
What Type of Coolant Is Best for My Vehicle?
You should choose the best coolant specified in your vehicle’s owner manual, usually ethylene glycol-based. Using the correct type guarantees optimal engine protection and supports vehicle maintenance by preventing corrosion and overheating effectively.
Can Coolant Leaks Cause Engine Overheating?
You don’t want your engine overheating, yet coolant leaks can cause exactly that. When coolant escapes, it reduces heat dissipation, forcing your engine to run hotter.
Fix leaks promptly to maintain optimal temperature and avoid damage.
How Long Can I Drive With a Small Coolant Leak?
You shouldn’t drive long with a small coolant leak; driving risks include engine overheating and damage.
Perform leak detection promptly to avoid costly repairs. Address the issue immediately to maintain safe, reliable vehicle operation.
Are All Coolant Leaks Dangerous to My Car?
Nearly 60% of engines suffer irreversible damage from coolant leaks. Not all leaks seem dangerous, but coolant toxicity can corrode parts and cause overheating.
You should address any leak promptly to avoid costly repairs and engine failure.
Can I Use Stop-Leak Products to Fix Coolant Leaks?
You can use stop-leak products and coolant additives for temporarily stopping leaks, but they’re not permanent fixes.
Rely on them only to buy time before properly repairing the leak to avoid further engine damage.