How to Hook up a Battery Charger
To hook up a battery charger safely, first wear goggles and gloves to protect yourself. Make sure your vehicle is parked on a flat, well-ventilated surface. This preparation is essential before you begin the charging process.
Next, identify your battery type and set the charger accordingly. Connect the positive (red) cable to the positive terminal on the battery. After that, attach the negative (black) cable to a grounded metal surface away from the battery to prevent sparks.
Double-check all connections to ensure they are secure. Avoid creating sparks by handling cables carefully. Monitor the charging process closely to maintain safety and efficiency.
Following these steps ensures a safe and effective battery charging experience. More detailed tips will help you master the process ahead.
What Tools and Safety Gear You’ll Need
What tools and safety gear do you need before hooking up a battery charger? First, you’ll need safety gear to protect yourself. Always wear safety goggles to shield your eyes from acid splashes and gloves to protect your hands from corrosive battery terminals. Avoid loose clothing that could catch on components.
For tools, a battery terminal cleaner or wire brush is essential for removing corrosion and ensuring a clean connection. You’ll also need a wrench or pliers to loosen and tighten the battery terminals securely.
Finally, have a multimeter on hand to check battery voltage before and after charging. Using the proper safety gear and tools guarantees a safe, efficient charging process, minimizing risks associated with battery acid and electrical hazards.
How to Position Your Vehicle and Battery Charger Safely
Position your vehicle on a flat, stable surface to prevent movement during charging. Make sure the area is well-ventilated to disperse any gases emitted by the battery. Keep the charger and vehicle away from flammable materials to reduce fire risk.
Select a Flat Surface
A stable, level surface provides the safest environment for connecting your battery charger. Before you begin, position your vehicle on a flat surface to prevent any movement that could disrupt the connection or cause injury.
Ensure the charger itself rests on a solid, flat surface to avoid tipping or electrical hazards during operation. This setup minimizes risks related to battery safety, such as acid spills or accidental short circuits caused by unstable positioning.
Avoid slopes, uneven ground, or cluttered areas that might interfere with the charger’s placement or your access to the battery terminals. By selecting a flat surface, you maintain control over the connection process and promote a secure, hazard-free charging environment.
Always double-check the stability before proceeding with the hookup.
Ensure Proper Ventilation
Once you’ve secured your vehicle and charger on a flat surface, focus on ensuring proper ventilation around the battery. Proper ventilation safety is critical because batteries emit hydrogen gas during charging, which can accumulate and pose explosion risks.
Position your vehicle in a well-ventilated area, preferably outdoors or in a garage with open doors and windows. If you must charge the battery during indoor storage, use a fan or ventilation system to disperse gases effectively.
Avoid enclosing the battery in tight spaces or covering it during charging, as this restricts airflow. Maintaining an open environment around the battery promotes safe dissipation of hazardous gases, reducing risk.
Always verify ventilation before starting the charger to ensure a safe charging process.
Keep Away From Flammables
How close should you keep flammable materials when charging a battery? You must position your vehicle and battery charger well away from anything combustible to prevent fire hazards. Avoid any unrelated topic or off-topic discussion that might distract you from focusing on safety measures.
Follow these guidelines to keep flammables at a safe distance:
- Maintain at least 3 feet (1 meter) clearance from gasoline, oil, or cleaning solvents.
- Ensure the charger is on a stable, non-flammable surface.
- Keep rags, paper, and other combustibles far from the battery area.
- Avoid charging near open flames, sparks, or smoking zones.
- Position the vehicle in a well-ventilated area to disperse explosive gases.
Strict adherence prevents accidents and ensures safe battery charging.
How to Identify Your Battery Type and Charger Compatibility
First, identify whether your battery is lead-acid, AGM, or lithium-ion, as each requires specific charging parameters. Next, check your charger’s voltage and amperage ratings to ensure they align with your battery’s specifications. Matching these correctly prevents damage and ensures efficient charging.
Common Battery Types
Which type of battery do you have, and is your charger compatible with it? Identifying common battery types ensures proper charging safety and efficient battery disposal.
Here are the primary types you may encounter:
- Lead-Acid (Flooded or AGM): Heavy-duty, requires specific chargers to avoid overcharging.
- Gel Cell: Sealed, sensitive to high voltage; use a charger with gel mode.
- Lithium-Ion: Lightweight, precise voltage control needed.
- Nickel-Cadmium (NiCd): Requires full discharge cycles to prevent memory effect.
- Nickel-Metal Hydride (NiMH): Less toxic, but still needs correct charger settings.
Always verify your charger matches the battery chemistry to prevent damage or hazards. Follow manufacturer guidelines closely for charging safety and proper battery disposal to extend battery life and protect the environment.
Charger Specifications Overview
Where do you start when matching your battery to a charger? First, identify your battery type: lead-acid, AGM, gel, or lithium, as each demands specific charging profiles. Review your charger’s specifications to ensure compatibility, focusing on voltage output, amperage range, and charging modes.
Proper charger selection impacts charging efficiency, preventing overcharging or undercharging, which can degrade battery life. Additionally, consider electrolyte maintenance for flooded lead-acid batteries; an appropriate charger will support periodic equalization to balance cells and reduce sulfation.
Check whether the charger offers multi-stage charging, essential for optimizing battery health and performance. Verifying these specifications upfront ensures your charger suits your battery’s chemistry and capacity, maximizing lifespan and maintaining optimal function throughout its service cycle.
Matching Charger To Battery
Although identifying your battery type may seem straightforward, it requires careful attention to guarantee charger compatibility. You need to match voltage, chemistry, and capacity precisely. Listen for a tiny humming sound when connecting the charger. This indicates proper electrical flow.
Use color psychology to differentiate terminal polarity; red usually signifies positive, black negative, preventing connection errors. To ensure compatibility:
- Verify battery chemistry: lead-acid, lithium-ion, or nickel-metal hydride
- Confirm voltage rating matches charger output
- Check charger amperage suits battery capacity
- Match connector types and terminal colors carefully
- Monitor charger indicators for correct operation and absence of unusual noises
This precise approach prevents damage and optimizes charging performance, ensuring your battery’s longevity and safety.
How to Set Your Battery Charger Before Charging
Before connecting the battery charger, you need to adjust its settings to match your battery’s specifications. First, identify the battery chemistry: lead-acid, AGM, or lithium, as chargers offer specific modes for each type. Selecting the correct chemistry prevents damage and guarantees optimal charging.
Next, set the appropriate charging current based on your battery’s amp-hour rating; a standard guideline is 10-20% of the battery capacity. Also, choose the charging voltage that corresponds to your battery’s design.
Finally, familiarize yourself with the charger’s charging indicators, such as LEDs or digital displays, that signal charging status, errors, or completion. Confirm that these are functioning properly before proceeding.
Precise adjustment of these parameters ensures safe, efficient charging and prolongs battery life. Avoid connecting cables until all settings are verified.
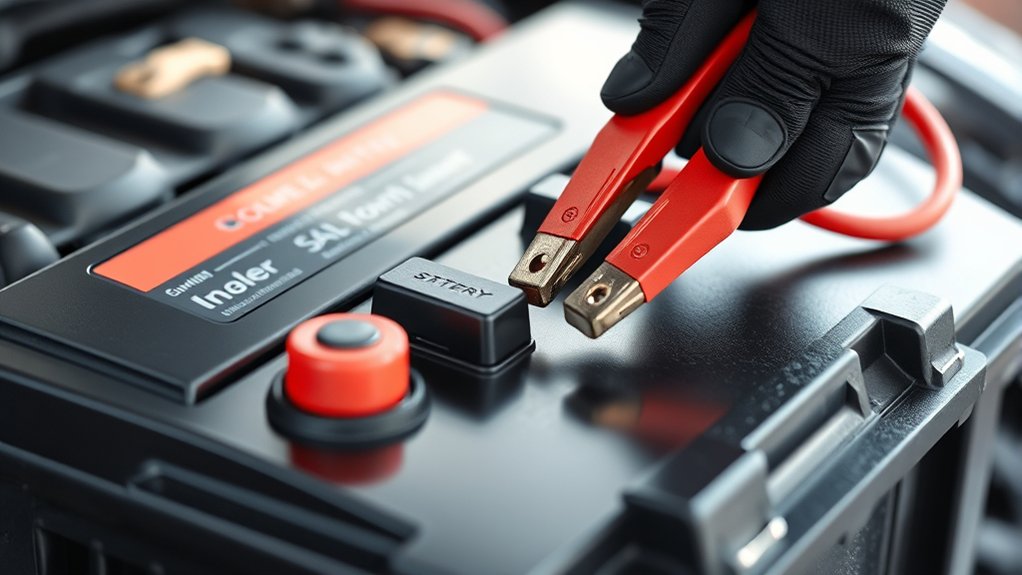
How to Connect Battery Charger Cables Safely
You need to start by identifying the correct polarity of the battery terminals to prevent damage. Make sure the charger cables are connected firmly to avoid loose contacts. Always connect the cables in a way that minimizes sparks and eliminates the risk of short circuits.
Identifying Correct Cable Polarity
How can you guarantee a safe and effective connection when hooking up a battery charger? Properly identifying cable polarity is essential for finding polarity and following safety basics. Connect the positive (red) cable to the battery’s positive terminal and the negative (black) cable to the negative terminal or a grounded metal surface. Incorrect polarity can cause sparks, damage, or injury.
Follow these steps to identify correct cable polarity:
- Inspect cable colors: red for positive, black for negative
- Verify battery terminal markings (+ for positive, – for negative)
- Use a multimeter if unsure about terminal polarity
- Avoid touching cables together or to metal before connection
- Double-check connections before powering the charger
Adhering to these guidelines ensures a safe, efficient charging process.
Securing Connections Firmly
Secure connections firmly to guarantee stable electrical contact and prevent accidental disconnections or sparks during charging. First, ensure the battery charger clips fully grasp the battery terminals without slipping. Use clamps with clean, corrosion-free jaws for optimal grip.
Avoid loose attachments by applying consistent pressure when connecting cables. Double-check polarity alignment before securing to prevent damage. During this process, stay focused and avoid irrelevant topics that could distract you from proper connection.
Reliable cable attachment not only maintains current flow but also reduces resistance and heat buildup. Keep discussion ideas about battery maintenance or charger settings separate until connections are secure.
Avoiding Sparks And Short Circuits
Why do sparks and short circuits pose significant risks when connecting battery charger cables? They can cause fires, damage the battery, or harm you. To connect cables safely and avoid these hazards, focus strictly on the correct procedures. Any unrelated topic or irrelevant focus can lead to mistakes.
Follow these steps:
- Always disconnect the charger from power before attaching cables.
- Connect the positive (red) cable to the battery’s positive terminal first.
- Attach the negative (black) cable last, preferably to a grounded metal surface away from the battery.
- Ensure cables don’t touch each other or other metal parts.
- Double-check all connections before powering the charger.
Why You Should Connect the Positive Terminal First
Although it might seem inconsequential, connecting the positive terminal first reduces the risk of short circuits during the charging process. When you attach the positive terminal initially, you establish a safe electrical path aligned with the battery chemistry, preventing accidental grounding.
This practice minimizes the chance of sparks, which can occur if the negative terminal is connected first and the charger’s positive cable contacts a grounded metal surface. Proper sequence ensures charging safety by controlling current flow and reducing exposure to electrical arcs.
Always verify the positive terminal is securely connected before proceeding to the negative terminal, as this approach protects both you and the battery from potential damage. Following this method aligns with best practices for maintaining battery integrity and safe operation during charging.
How to Attach the Negative Terminal Without Sparks
How exactly do you attach the negative terminal without causing sparks? Follow strict charger etiquette to ensure safety and maintain battery aesthetics. Sparks often result from improper grounding or loose connections. To avoid this, adhere to these steps:
Always connect the positive terminal first, then the negative. Attach the negative clamp to an unpainted metal surface on the vehicle’s frame, away from the battery. Confirm all connections are secure and free of corrosion.
Avoid touching the clamps together or other metal parts during connection. Double-check the charger is off before making the final connection.
How to Monitor the Charging Process Safely
When should you check the battery charger during operation? You should inspect it at regular intervals, typically every 15 to 30 minutes, to ensure optimal battery safety and maintain proper charging etiquette. Begin by verifying the charger’s voltage and current output using tools with up-to-date tool calibration to avoid inaccurate readings.
Monitor the battery terminals for excessive heat or corrosion, which can indicate issues requiring immediate attention. Always ensure the charging area complies with ventilation standards to prevent gas buildup and reduce fire risk. Avoid touching terminals or charger components during operation to minimize shock hazards.
When and How to Disconnect Your Battery Charger
Disconnect your battery charger promptly once the battery reaches full charge to prevent overcharging and potential damage. Avoid introducing any irrelevant topic or unrelated concept during this step to maintain focus on safety and efficiency.
Follow these precise actions to disconnect properly:
- Turn off the charger before unplugging to prevent sparks.
- Remove the negative (black) clamp first to reduce short circuit risk.
- Detach the positive (red) clamp only after the negative is removed.
- Store the charger cables neatly to avoid damage.
- Inspect the battery terminals for any corrosion or residue after disconnection.
Common Battery Charger Mistakes to Avoid
Why do some battery charging attempts fail or cause damage? Often, it’s due to neglecting battery safety and improper charger maintenance. You must avoid connecting clamps to the wrong terminals; reversing polarity risks sparks or battery damage.
Don’t charge a frozen or visibly damaged battery. This compromises safety and effectiveness. Avoid overcharging by selecting the correct charger settings; excessive voltage shortens battery life.
Always perform charger maintenance by inspecting cables and connectors for corrosion or wear before use. Ensure the charger’s ventilation isn’t blocked to prevent overheating.
Lastly, never charge in an enclosed space without ventilation, as gases may accumulate dangerously. By following these precise precautions, you’ll protect both yourself and your battery, ensuring reliable and safe charging every time.
How to Troubleshoot Battery Charging Issues Like a Pro
How can you quickly identify and resolve common battery charging problems? Start by applying proven troubleshooting techniques to isolate the issue. Focus on two word discussion ideas like “voltage drop” and “charging cycle” to guide your diagnosis. Consider battery chemistry since different types require specific charging parameters.
Follow these steps to troubleshoot like a pro:
- Verify charger output voltage matches battery specifications
- Inspect and clean battery terminals for corrosion or loose connections
- Measure battery voltage before and during charging to detect faults
- Test charger cables and connectors for continuity and damage
- Review charger settings to ensure compatibility with battery chemistry
Frequently Asked Questions
How Long Does It Take to Fully Charge a Car Battery?
It typically takes 4 to 24 hours to fully charge a car battery, depending on charging cycles and temperature effects. Higher temperatures speed charging, while colder conditions slow it down, so monitor both for efficient charging.
Can I Use a Battery Charger on a Frozen Battery?
You shouldn’t use a charger on a frozen battery; charger compatibility requires the battery to be thawed first.
Charging a frozen battery risks damage and inaccurate readings. Always guarantee the battery is fully thawed before connecting the charger.
Is It Safe to Jump-Start a Battery With a Charger?
You shouldn’t jump-start a battery with a charger unless it supports isolation safety and charging compatibility. Using incompatible chargers risks damage or injury, so always verify specs and follow manufacturer guidelines for safe, effective charging.
What Are the Signs My Battery Needs Replacement Instead of Charging?
When your battery’s like a fading star, dim lights and slow starts are clear signs of failure. Replacement indicators include swelling, corrosion, and inability to hold charge despite charging attempts. Test voltage to confirm.
Can a Battery Charger Damage My Vehicle’s Electrical System?
Yes, using a charger incompatible with your battery can damage your vehicle’s electrical system. Always verify battery compatibility and follow charging safety protocols to prevent voltage spikes or reverse polarity that could harm sensitive electronics.