How to Use a Trickle Battery Charger
To use a trickle battery charger, first ensure your battery is clean, undamaged, and properly prepared. This initial step is crucial for safe and effective charging.
Unplug the charger before connecting clamps—attach the positive clamp to the battery’s positive terminal and the negative clamp to a clean metal surface away from the battery. This helps prevent sparks and potential damage.
Plug in the charger, which will supply a low, constant current to maintain charge without overcharging. Monitor voltage and connections regularly to avoid damage.
Following careful steps keeps your battery healthy and ready. Discover detailed best practices for optimal results.
Key Takeaways
- Unplug the charger before attaching clamps. Connect the positive clamp to the battery positive terminal, and the negative clamp to a clean metal frame surface.
- Store the battery in a cool, dry, ventilated area between 32°F and 77°F before charging.
- Monitor battery voltage and charger output every 12-24 hours to prevent overcharging or undercharging.
- Use a charger compatible with your battery type and verify correct polarity to avoid damage.
- Unplug the charger before disconnecting clamps, starting with the negative terminal. Store the charger in a dry place.
What Is a Trickle Charger and How It Works
How does a trickle charger maintain your battery without overcharging it? It supplies a low, steady current that matches your battery’s self-discharge rate, preventing excessive voltage buildup.
Unlike unrelated topic chargers that push high currents quickly, trickle chargers carefully monitor voltage and current, automatically switching to maintenance mode once the battery reaches full charge. This precise control avoids damage and prolongs battery life.
You might think of it as a two word discussion idea: “gentle charging.” Understanding how it works lets you appreciate its role in keeping batteries healthy during long storage periods.
When Should You Use a Trickle Charger for Your Battery?
You should use a trickle charger when storing your battery for extended periods to maintain an optimal charge level. It helps prevent battery sulfation and capacity loss during inactivity. Keeping your battery charged this way ensures it’s ready for use when you need it.
Ideal Storage Conditions
When should you use a trickle charger to maintain your battery’s health? You should connect it during long-term storage, especially when environmental factors like temperature fluctuations and humidity threaten battery integrity.
Ideal storage conditions involve a cool, dry place with stable temperatures, typically between 32°F and 77°F (0°C to 25°C). Extreme cold or heat accelerates self-discharge and damages battery components.
A trickle charger compensates for natural discharge without overcharging, preserving capacity and extending lifespan. Avoid storage in damp or poorly ventilated areas, as moisture and corrosive elements can degrade terminals and internal cells.
Using a trickle charger under optimal storage conditions ensures your battery stays ready for use and minimizes the risk of deep discharge or sulfation caused by adverse environmental factors.
Maintaining Battery Charge
Why monitor your battery’s charge regularly? Proper maintenance routines prevent sulfation and capacity loss. Use a trickle charger during seasonal storage or extended inactivity to keep the battery at optimal voltage without overcharging.
Trickle chargers provide a low, steady current, ideal for maintaining charge without damage.
| Condition | When to Use Trickle Charger | Benefits |
|---|---|---|
| Seasonal Storage | Immediately after full charge | Prevents discharge and degradation |
| Infrequent Use | Weekly or biweekly intervals | Maintains full charge |
| Long-Term Storage | Continuous low current supply | Avoids deep discharge |
| Battery Type | Lead-acid, AGM, Gel | Optimizes battery lifespan |
| Maintenance Routine | As part of regular upkeep | Ensures readiness and reliability |
Following these guidelines ensures your battery stays healthy and ready.
Using a Trickle Battery Charger on Different Vehicles
How does a trickle battery charger adapt to the varying requirements of different vehicles? The key lies in understanding your vehicle’s battery specifications and charger settings. Whether you’re charging a motorcycle, car, or boat battery, the trickle charger regulates current to provide a slow, steady charge without overloading.
This two word idea, “controlled charging,” prevents damage, ensuring battery longevity. For smaller batteries like motorcycles, low amperage settings are ideal, while larger vehicle batteries require higher output but still within trickle limits. Avoid confusion with unrelated topic concerns such as engine size, which doesn’t affect charging parameters.
Always refer to your charger’s manual to match settings to battery type—lead-acid, gel, or AGM—to optimize performance. Proper use on different vehicles means safer charging and extended battery life.
Preparing Your Battery for Trickle Charging
Before you start trickle charging, inspect your battery for any damage or leaks to ensure safety. Clean the battery terminals thoroughly to guarantee a solid connection and efficient charging. Also, make sure the area is well-ventilated to prevent the buildup of hazardous gases during the process.
Inspect Battery Condition
When was the last time you checked your battery’s condition? Before connecting a trickle charger, inspecting connections and testing indicators are essential steps to ensure safety and effectiveness.
Begin by visually examining the battery case for cracks or bulges. Next, inspect the terminals and cables for corrosion or loose connections. Use a multimeter or built-in testing indicators to check voltage levels and state of charge.
Confirm that the battery is not excessively discharged or damaged, as trickle charging won’t restore a compromised battery. Finally, ensure the battery fluid levels are adequate if it’s a serviceable type.
- Look for physical damage or swelling
- Inspecting connections for corrosion or looseness
- Test voltage and charge indicators accurately
- Verify battery is not deeply discharged
- Check electrolyte levels when applicable
Clean Battery Terminals
Why does cleaning battery terminals matter? Dirty or corroded terminals interfere with electrical conductivity, reducing charging efficiency and potentially damaging your battery.
To prepare for trickle charging, start by disconnecting the battery cables, negative first. Use a wire brush or battery terminal cleaner to scrub the terminals and cable clamps thoroughly, removing any corrosion or buildup.
For stubborn corrosion, apply a mixture of baking soda and water to neutralize acid deposits, then rinse with clean water and dry completely.
Keeping clean terminals ensures a reliable electrical connection, which is essential for effective trickle charging.
After cleaning, consider applying a thin layer of petroleum jelly or specialized corrosion prevention spray to the terminals. This step helps maintain clean terminals longer and protects against future corrosion, extending your battery’s lifespan and performance.
Ensure Proper Ventilation
How should you set up your workspace to guarantee safe trickle charging? Proper ventilation is crucial to avoid hazards like hydrogen gas buildup, which can ignite. Ensure your area allows fresh air circulation to disperse gases safely and reduce indoor moisture, preventing corrosion and electrical shorts.
Follow these guidelines:
- Charge in a well-ventilated space, ideally near open windows or vents
- Avoid enclosed areas where gases can accumulate
- Use fans if natural airflow is insufficient
- Keep the battery elevated to allow air circulation underneath
- Monitor humidity levels to prevent indoor moisture buildup
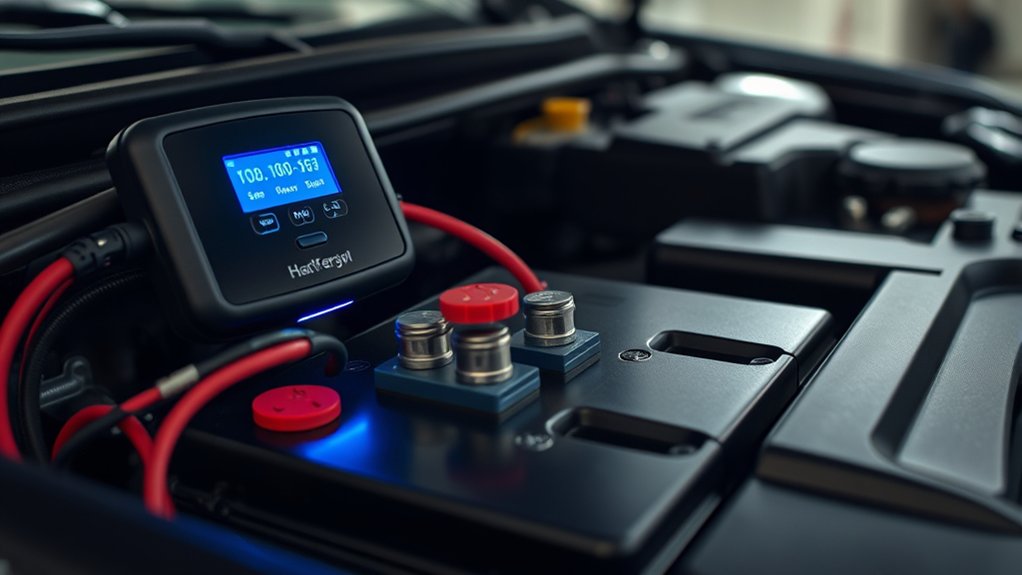
How to Connect Your Trickle Charger Safely
A safe connection is essential to prevent damage to your battery and charger. First, ensure the trickle charger is unplugged before connecting. Attach the positive (red) clamp to the battery’s positive terminal.
Ensure the trickle charger is unplugged before attaching the positive clamp to the battery’s positive terminal for safety.
Next, connect the negative (black) clamp to a clean, unpainted metal surface on the vehicle’s frame or engine block for effective drain prevention and to avoid sparking near the battery. Verify all connections are secure and free of corrosion.
Use insulated wiring to enhance wiring safety, avoiding exposed wires that could short circuit. Keep cables clear of moving engine parts and hot surfaces.
After double-checking polarity and connection integrity, plug in the charger. Following these steps minimizes risk, protects electrical components, and ensures your trickle charger operates efficiently without causing damage.
Monitoring Your Battery During Trickle Charging
When should you check your battery while using a trickle charger? Regular monitoring is essential to prevent battery discharge and ensure effective charging. Check your battery every 12 to 24 hours, depending on its condition and charger specifications.
Use well-calibrated tools to get accurate voltage and current readings. Proper tool calibration is critical for assessing battery health and charging status.
Focus on these key monitoring tasks:
- Measure battery voltage to detect undercharging or overcharging
- Inspect electrolyte levels if applicable to prevent damage
- Verify charger output matches manufacturer specifications
- Look for signs of overheating or swelling in the battery
- Ensure charger connections remain secure and corrosion-free
Consistent monitoring helps maintain battery longevity and prevents unexpected failures during trickle charging.
Common Trickle Charger Mistakes to Avoid
Why do so many users run into issues with trickle chargers? Often, it’s due to improper connection, leaving the charger on too long, or ignoring battery type specifications. Avoid these common mistakes to ensure safety and efficiency.
| Mistake | Impact |
|---|---|
| Reversing polarity | Damages battery and charger |
| Overcharging | Reduces battery lifespan |
| Using wrong charger type | Inefficient charging or battery harm |
| Ignoring ventilation | Risk of dangerous gas buildup |
Stay aware of charger compatibility and connection polarity. Don’t leave the charger unattended for extended periods. Regularly check battery condition and avoid charging sealed and flooded batteries interchangeably.
Disconnecting and Storing Your Trickle Charger
Properly disconnecting and storing your trickle charger extends its lifespan and maintains safety. First, unplug the charger from the power source, then detach the clamps from the battery terminals, starting with the negative terminal to prevent sparks.
Store the charger in a dry, cool place away from direct sunlight and moisture. Follow local disposal guidelines for worn-out chargers to minimize environmental impact.
Battery theft prevention is crucial; keep the charger and battery secure, especially if stored outdoors or in shared spaces.
- Always disconnect power before removing clamps
- Avoid coiling cables tightly to prevent damage
- Store in a ventilated, dust-free environment
- Inspect cables regularly for wear or corrosion
- Dispose of chargers per local environmental regulations
Frequently Asked Questions
Can a Trickle Charger Damage a Sealed Lead-Acid Battery?
You won’t damage a sealed lead-acid battery using a trickle charger if you follow proper voltage limits.
Ignoring safety concerns can lead to damage, but unrelated topic chargers or improper use pose greater risks to battery health.
How Long Does a Typical Trickle Charging Cycle Last?
A typical trickle charging cycle lasts 12 to 24 hours, balancing charging efficiency and maintenance scheduling.
You’ll ensure the battery stays topped off without overcharging, preserving its lifespan and performance during extended periods of use or storage.
Are Trickle Chargers Compatible With Lithium-Ion Batteries?
Trickle chargers typically lack lithium ion compatibility, risking overcharge and damage.
You should use chargers specifically designed for lithium-ion batteries to ensure trickle charging safety, maintaining battery health and preventing potential hazards effectively.
Can I Leave My Battery on a Trickle Charger During Winter Storage?
You absolutely can leave your battery on a trickle charger during winter storage! Thanks to sealed battery safety, lithium compatibility, and auto shut off features, it manages charging cycle duration perfectly without overcharging or damage.
Do Trickle Chargers Have Automatic Shut-Off Features?
Yes, many trickle chargers include automatic shut off to prevent overcharging, enhancing battery safety. You’ll appreciate this feature because it stops charging once your battery’s full, avoiding damage and extending its lifespan efficiently.
Conclusion
Now that you know how to safely use a trickle battery charger, are you ready to keep your battery healthy and reliable? By preparing your battery properly, connecting the charger correctly, and monitoring the process, you’ll avoid common mistakes and extend your battery’s life.
Remember to disconnect and store the charger properly when done. With these practical steps, maintaining your battery’s charge is simple and efficient.
Why risk battery failure when prevention is this easy? Using a trickle battery charger regularly is the key to ensuring your battery stays in top condition for the long haul.