Where to Put Jumper Cables on Battery
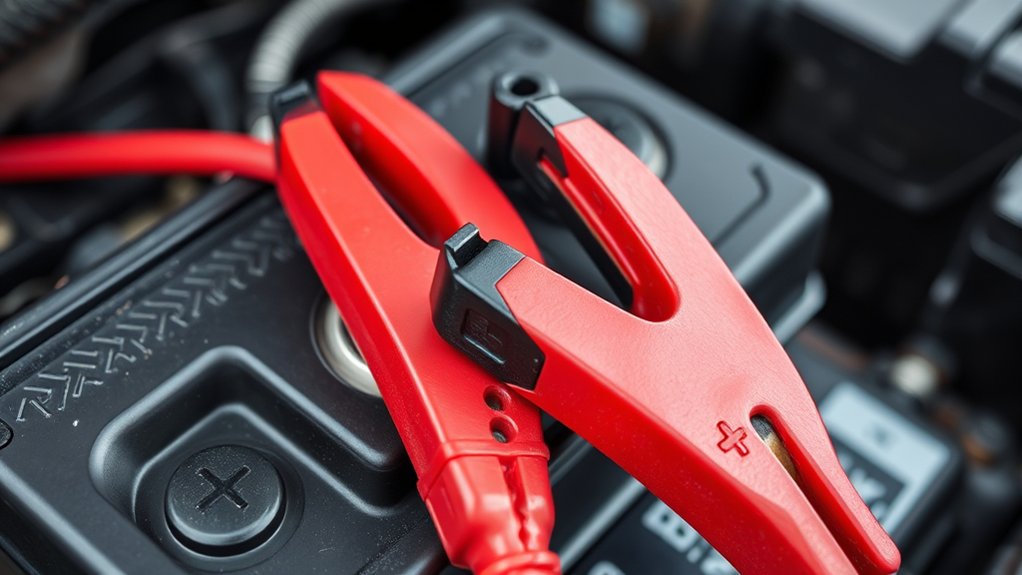
Attach the red jumper cable clamp to the positive (+) terminal on the dead battery, usually marked with a plus sign and often covered in red. This is a crucial step when learning where to put jumper cables on a battery to ensure a proper connection. Connect the other end of the red cable to the positive terminal of the donor battery.
Next, attach the black clamp to the negative (–) terminal of the good battery. However, do not connect the black clamp directly to the dead battery’s negative terminal. Instead, fasten it to a clean, unpainted metal surface away from the battery to prevent sparks.
Following these precise connection steps is essential for safe and effective jump-starting. Be sure to learn more about completing the process safely to avoid any hazards.
Identifying Positive and Negative Battery Terminals on Your Car Battery
How can you quickly tell which terminal on your car battery is positive or negative? Start by focusing on identifying terminals through battery labeling. Typically, the positive terminal is marked with a plus sign (+) and often features a red plastic cover or red paint on the terminal post.
The negative terminal displays a minus sign (–) and usually has a black or unpainted metal finish. Additionally, the positive terminal tends to be slightly larger in diameter than the negative one.
Carefully inspect these markings and physical differences before proceeding with any work on your battery to avoid mistakes. Properly identifying terminals ensures safety and correct connection when using jumper cables or performing maintenance on your vehicle’s electrical system.
Where to Clip Jumper Cables on Your Battery
Where exactly should you attach the jumper cables to guarantee a safe and effective jump start? Start by clipping the red (positive) cable to the positive terminal of the dead battery, identified by a plus sign (+) or red cover. Then, connect the other end of the red cable to the positive terminal on the donor battery.
Next, attach the black (negative) cable to the negative terminal of the donor battery, marked with a minus sign (–) or black cover. For the dead battery, do not connect the black cable directly to its negative terminal; instead, attach it to a clean, unpainted metal surface on the engine block or chassis away from the battery.
Following these jump start basics ensures safety and protects your vehicle’s electrical system. Proper battery maintenance includes correct cable placement to prevent sparks or damage.
Step-by-Step Guide to Safely Connecting Jumper Cables
First, identify the positive and negative terminals on both batteries to avoid incorrect connections. Next, attach the jumper cables in the proper sequence to prevent sparks or damage. Finally, guarantee each clamp is securely fastened and positioned away from moving parts for safety.
Identify Positive And Negative Terminals
Why does correctly identifying the positive and negative terminals matter when connecting jumper cables? Properly identifying terminals ensures a safe connection and prevents damage to the vehicle’s electrical system.
Start by locating the battery on both vehicles. The positive terminal is typically marked with a plus sign (+) and often uses red color coding on both the terminal and cable. The negative terminal shows a minus sign (–) and usually has black color coding.
Carefully inspect the battery posts; some may have plastic covers you need to remove. Confirm you’re identifying terminals, not other nearby metal parts, to avoid accidental short circuits.
Accurately distinguishing positive and negative terminals is essential before proceeding to cable connection, ensuring safety and functionality throughout the jump-start process.
Connect Cables In Correct Order
How exactly should you connect jumper cables to guarantee safety and effectiveness? Start by attaching the red clamp to the positive (+) terminal of the dead battery. Then, connect the other red clamp to the positive terminal of the good battery.
Next, attach the black clamp to the negative (–) terminal of the good battery. Finally, connect the remaining black clamp to an unpainted metal surface away from the dead battery’s terminal, like the engine block. This order prevents sparks and ensures proper current flow.
While this doesn’t directly affect finding fuel efficiency or checking tire tread, maintaining your vehicle’s electrical system helps overall performance. Following this precise sequence minimizes risk and prepares you for a successful jump-start.
Ensure Secure And Safe Connections
After connecting the jumper cables in the correct order, make certain each clamp grips firmly to its designated terminal or grounding point. A loose connection can cause sparking or prevent the vehicle from starting.
Check that the red clamp securely attaches to the positive terminal and the black clamp to the negative terminal or a clean metal surface away from the battery. Avoid placing clamps near the secure water bottle or any fluid reservoirs to prevent contamination.
While working, ensure your vehicle is on a stable surface with appropriate tire pressure to avoid accidental movement. Double-check all connections before starting the engine.
Following these precise steps minimizes electrical hazards and ensures a safe jump-start process. Always wear safety gloves and eye protection during this procedure for added safety.
Common Jumper Cable Mistakes and How to Avoid Them
What common mistakes do people make when connecting jumper cables, and how can you avoid them? First, never confuse the polarity; attaching red clamps to the negative terminal or black clamps to the positive causes sparks or damage.
Never confuse polarity when connecting jumper cables to avoid sparks or damage.
Second, avoid connecting cables in the wrong order. Always start with the positive terminals first.
Third, don’t touch the clamps together once connected. This creates a short circuit.
Many jump-start errors stem from unrelated topic distractions or random thought interruptions. Stay focused and follow steps methodically.
Also, disregard any off-topic or irrelevant chatter while working, as it increases the chance of mistakes.
Finally, ensure clamps grip solid metal surfaces free of corrosion and dirt for a reliable connection. By adhering to these technical precautions, you’ll safely and effectively jump-start your vehicle.
Why Connect the Negative Cable to the Car Frame
You connect the negative cable to the car frame to reduce the risk of sparks near the battery, which can cause explosions. This grounding method also helps prevent electrical damage by providing a stable path for current flow. Always attach the negative clamp to an unpainted metal surface on the engine block or chassis for optimal safety.
Safety Reasons Explained
Why should you connect the negative jumper cable to the car frame instead of directly to the battery terminal? Doing so minimizes the risk of sparks near the battery, which can ignite explosive gases. Proper safety training emphasizes this step to protect you and the vehicle. Always wear personal protective gear to reduce injury risk.
| Reason | Explanation | Outcome |
|---|---|---|
| Spark reduction | Frame connection is away from battery | Prevents battery explosion |
| Grounding efficiency | Frame provides a solid grounding point | Ensures proper current flow |
| Safety compliance | Standard procedure in safety training | Protects user and equipment |
Connecting to the frame enhances safety by reducing hazards during jump-starting.
Preventing Electrical Damage
Although connecting the negative jumper cable directly to the battery terminal might seem straightforward, attaching it to the car frame prevents electrical damage by providing a stable grounding point that avoids voltage spikes. When you clamp the negative cable to the car frame, you reduce the risk of sparks near the battery, which can ignite flammable gases.
This practice is essential for proper battery maintenance and ensures electrical safety by minimizing transient voltage surges that could damage sensitive electronics. Always locate an unpainted metal surface on the engine block or chassis as your grounding point.
Jump-Starting Different Battery Types and Terminal Shapes
Different battery types and terminal shapes require specific approaches when connecting jumper cables to guarantee a safe and effective jump-start. Ignoring these nuances can lead to confusion or mistakes, treating the procedure as an unused topic or irrelevant concept. Follow these steps:
- Standard Lead-Acid Batteries: Attach red cable clamps to the positive (+) terminal, and black clamps to the negative (−) terminal. Terminals are usually post-shaped.
- AGM or Gel Batteries: These often have flat or recessed terminals. Use clamps that fit securely without slipping, ensuring full contact.
- Different Terminal Shapes: For side-post or top-post designs, identify terminal polarity clearly. Avoid forcing clamps on incompatible shapes to prevent damage or poor connection.
Always confirm terminal polarity before connecting to avoid electrical hazards.
What to Do After Connecting Jumper Cables to Start Your Car
Once you’ve securely connected the jumper cables, how do you proceed to start your car safely? First, ensure the assisting vehicle’s engine is running at moderate RPM to provide stable voltage. Then, attempt to start your car without cranking excessively; if it doesn’t start within 10 seconds, wait a minute before retrying.
Once started, keep both engines running for several minutes to allow the dead battery to recharge. This step promotes fuel efficiency by preventing repeated jump-start attempts and excessive idling.
How to Disconnect Jumper Cables Without Causing Damage
How should you disconnect jumper cables to avoid damaging your vehicle’s electrical system? Follow a strict disconnecting procedure to ensure post jump safety and prevent electrical shorts or sparks.
- Remove the negative cable from the previously dead battery. This reduces the risk of sparks near the battery, which could ignite flammable gases.
- Disconnect the negative cable from the booster battery. By removing this last, you minimize current flow and stabilize both electrical systems.
- Finally, remove the positive cables in the reverse order they were connected. This completes the procedure without creating a short circuit.
Always handle the clamps by insulated handles, avoiding contact with metal parts. Following this sequence maintains electrical integrity and ensures your vehicle’s systems remain unharmed after jump-starting.
Essential Safety Tips for Jump-Starting Your Car Battery
Why must you follow strict safety protocols when jump-starting your car battery? Jump start safety is critical to prevent electric shock, sparks, or battery damage.
First, ensure both vehicles are off and in park or neutral with parking brakes engaged. Avoid touching the clamps together or the cable ends to metal surfaces.
Connect the jumper cables in the correct sequence: positive terminal of the dead battery, positive terminal of the good battery, negative terminal of the good battery, and finally a grounded metal surface on the dead car away from the battery.
Never lean directly over the battery during the process. After jump-starting, remove cables in reverse order. Following these steps protects you and supports proper battery maintenance by preventing short circuits and damage to the electrical system.
Frequently Asked Questions
Can Jumper Cables Damage My Car’s Electrical System?
You won’t blow up your car like a rocket if you use jumper cables wrong, but improper connection can damage circuits. Understanding jumper cable myths and practicing can battery safety prevents electrical system harm.
Stay precise, connect carefully.
How Long Should I Wait Before Trying to Start the Car?
Wait about 3-5 minutes after connecting jumper cables before starting the car. During jump start safety, perform battery voltage checks to guarantee sufficient charge, preventing damage and confirming readiness for a safe engine ignition.
What Gauge Jumper Cables Are Best for Different Vehicles?
Think of gauge cable like water hoses: smaller cars need 10-12 gauge for proper flow, while larger vehicles demand thicker 4-6 gauge cables.
Match gauge cable size to vehicle size for efficient, safe jump-starts every time.
Can I Use Jumper Cables on a Completely Dead Battery?
You can use jumper cables on a completely dead battery, but take safety precautions: ensure proper cable connections, avoid sparks, and wear protective gear. Confirm your cables and donor battery match voltage specifications before attempting a jump start.
Are There Alternatives to Jumper Cables for Jump-Starting?
If you’re stranded, try a portable jump starter, an alternative power source that eliminates safety risks from incorrect cable use. These devices provide controlled power delivery, ensuring a safer, quicker jump-start without needing another vehicle’s battery.