What Order to Remove Jumper Cables
You remove jumper cables in this order: first, disconnect the positive clamp from the dead battery, then the positive from the donor battery.
Next, remove the negative clamp from the donor battery, and finally the negative clamp from the dead battery.
This sequence minimizes sparks and electrical shorts by maintaining proper grounding and avoiding unintended current flow.
Always ensure both vehicles are off and use insulated gloves.
Following this method protects electrical systems and your safety.
Explore further to understand detailed precautions and variations for different vehicles.
Why Removing Jumper Cables in the Right Order Matters
Why does the order of removing jumper cables matter? You must follow a specific sequence to prevent electrical shorts, sparks, or damage to the vehicle’s electrical systems. Incorrect removal risks exposing you to electrical shock or damaging sensitive components.
When you methodically disconnect the cables, you minimize the chance of accidental contact between the clamps and metal surfaces, which could cause a dangerous arc. It’s also important to discuss safety by wearing gloves and avoiding touching the clamps together.
Additionally, you should review legality because some jurisdictions mandate proper handling of jumper cables to prevent liability issues. Following the correct removal order ensures compliance with safety standards and legal requirements, protecting both you and your vehicle from harm or legal consequences.
Safety Checks Before Removing Jumper Cables
Before you start removing the jumper cables, perform a series of safety checks to ensure the process goes smoothly and without incident. First, confirm both vehicles are turned off, preventing electrical surges.
Begin by ensuring both vehicles are off to avoid electrical surges when removing jumper cables.
Next, verify that the cables show no visible damage such as frayed wires or corrosion, as compromised cables hinder safe handling. Check that the battery terminals are clean and secure to avoid sparks.
Ignore common battery myths, like the belief that removing cables quickly reduces shock risk; careful, deliberate actions are safer. Lastly, make sure you’re wearing insulated gloves and that no metal objects contact the terminals.
Conducting these checks methodically reduces hazards, ensuring that the removal process is controlled, preventing injury or damage to either vehicle’s electrical system.
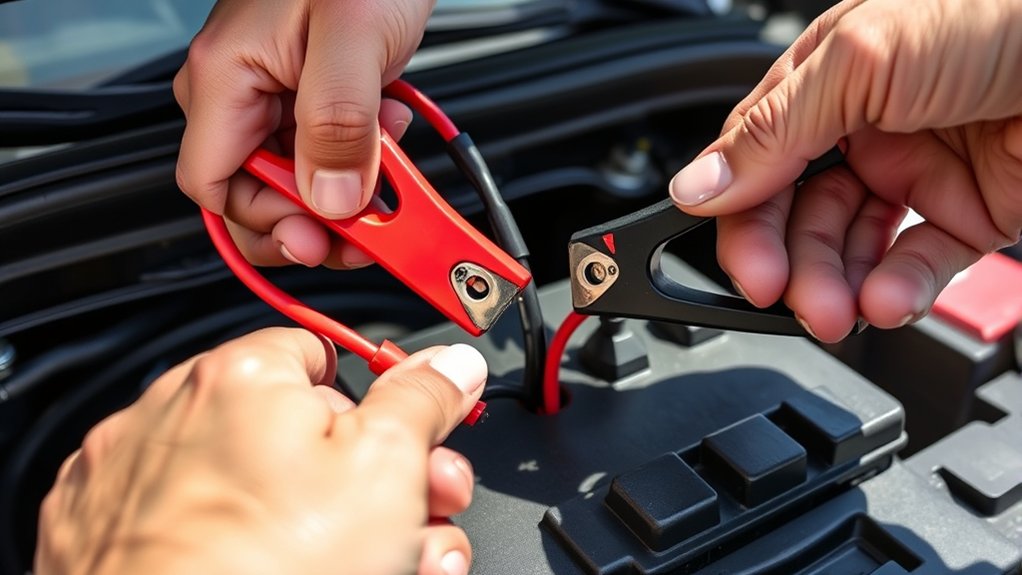
The Step-by-Step Safe Way to Remove Jumper Cables
How should you proceed to remove jumper cables safely without risking sparks or damage? First, ensure both vehicles are turned off and the keys removed. Begin by disconnecting the positive (red) clamp from the previously dead battery, followed by the positive clamp from the donor battery.
Next, carefully remove the negative (black) clamp from the donor battery, then from the previously dead battery. Avoid any contact between clamps during removal.
After disconnecting, perform battery testing on the revived battery to confirm it holds a charge. Finally, conduct post use maintenance by inspecting jumper cables for damage or corrosion and store them properly.
Following this step-by-step method ensures safety and prolongs the life of your jumper cables and vehicle batteries.
Why Remove the Negative Cable Last
When you remove jumper cables, you’ll want to disconnect the negative cable last to minimize the risk of sparks and short circuits. The negative cable sequence is critical because the negative terminal serves as the vehicle’s ground point.
Removing it last ensures that the circuit remains properly grounded throughout the disconnection process. If you were to remove the negative cable first, the system could lose proper grounding, increasing the chance of accidental electrical discharge.
Maintaining proper grounding prevents unintended current flow that could damage vehicle electronics or cause injury. By following the negative cable sequence, positive cables first, then negative last, you maintain a safe and controlled disconnection, preserving both your safety and the vehicle’s electrical integrity.
How to Avoid Sparks and Electrical Damage When Removing Cables
You need to follow the correct cable removal sequence to minimize the risk of sparks and electrical damage. Always disconnect the negative cable last while ensuring the engine and accessories are off. Additionally, maintain steady control and avoid letting cable clamps touch each other or metal surfaces during removal.
Correct Cable Removal Sequence
Why does the correct cable removal sequence matter? Following proper cable etiquette ensures you minimize the risk of sparks and electrical damage. Start by disconnecting the negative (-) clamp from the previously dead battery, then remove the negative clamp from the donor battery.
Next, detach the positive (+) clamp from the donor battery, followed by the positive clamp from the previously dead battery. This sequence maintains charge etiquette by preventing current from flowing through unintended paths, which could cause short circuits or damage sensitive electronics.
Always remove cables in this order to control the electrical flow safely and maintain system integrity. By adhering to this methodical approach, you protect both vehicles’ electrical systems and reduce the risk of injury or costly repairs caused by improper cable removal.
Safety Precautions During Removal
Following the correct cable removal sequence considerably reduces the chances of sparks and electrical damage, but additional safety measures help ensure a secure process. Disregarding these precautions can reinforce security myths and raise ethical concerns about responsible handling.
To avoid hazards when removing jumper cables:
- Disconnect cables slowly and steadily to prevent sudden electrical arcs.
- Wear insulated gloves and ensure no metal contacts the clamps during removal.
- Keep the vehicle engines off and avoid touching both clamps simultaneously to eliminate shock risk.
Adhering to these steps mitigates electrical risks effectively. Remember, dismissing proper safety protocols not only endangers you but also perpetuates misinformation about jumper cable safety and ethical responsibility in vehicle maintenance.
Troubleshooting Common Problems During Cable Removal
When removing jumper cables, you need to check for secure connections to prevent accidental disconnections. Be prepared to manage spark risks by maintaining proper distance and avoiding contact with metal surfaces. Always confirm that the grounding points remain stable to ensure safe cable removal.
Cable Connection Issues
How do you guarantee safe and effective removal of jumper cables without causing sparks or damage? Proper cable connection is crucial, especially considering battery ownership responsibilities and social etiquette when assisting others. Addressing common cable connection issues ensures smooth removal.
- Confirm secure clamps: Check that clamps firmly grip the battery terminals to prevent slippage during removal.
- Identify reversed polarity: Ensure cables connect positive to positive and negative to negative; reversed connections can cause damage.
- Inspect cable condition: Look for frayed wires or corrosion that may disrupt current flow or spark hazards.
Handling Spark Risks
Why do sparks often appear during jumper cable removal, and how can you prevent them? Sparks occur when the circuit is suddenly broken, causing a brief surge of current. To minimize this, you need to control handling torque on the cable clamps carefully.
Apply steady, deliberate force to avoid abrupt disconnections that generate arcs. Battery placement also plays a crucial role. Ensure both vehicles are stationary with batteries accessible but separated enough to prevent accidental contact.
Start by removing the negative cable from the dead battery first, then the negative from the booster. Next, remove the positive cable from the booster, followed by the positive from the dead battery.
This sequence maintains circuit stability and reduces spark risk. Always avoid twisting or jerking clamps, as improper handling torque increases the likelihood of sparks.
Ensuring Proper Grounding
Although proper cable removal reduces spark risks, ensuring correct grounding remains essential to avoid electrical faults during the process. Grounding best practices help maintain battery health and prevent damage to sensitive electronics.
When removing jumper cables, follow these steps:
- Disconnect the negative cable from the grounded vehicle first to break the circuit safely.
- Avoid touching both clamps simultaneously to prevent accidental short circuits.
- Ensure the clamp removed last is not near any metal surfaces to avoid unintended grounding.
Removing Jumper Cables Safely for Different Vehicle Types
When removing jumper cables, you must consider the specific type of vehicles involved to prevent damage or injury. For standard lead-acid batteries, disconnect the cables in reverse order of connection: negative clamp from the grounded vehicle, then negative from the booster, followed by positive from the booster, and finally positive from the dead battery.
With electric or hybrid vehicles, consult the manufacturer’s guidelines first, as improper removal can affect sensitive electronics and compromise safe driving. Different battery types, such as AGM or lithium-ion, may require specialized procedures to avoid voltage spikes or short circuits.
Always ensure the vehicles remain off during disconnection. By methodically removing cables according to battery type and vehicle specifications, you maintain electrical integrity and reduce the risk of sparks, safeguarding both vehicles and yourself.
Tips for Storing and Maintaining Jumper Cables After Use
After safely removing jumper cables according to vehicle and battery type, the next step is to properly store and maintain them to assure reliability and longevity. Following established storage guidelines and safety training principles prevents damage and hazards.
Here are three essential tips:
- Clean and Inspect: Wipe cables with a dry cloth to remove dirt and moisture. Check insulation for cracks or wear to maintain electrical safety.
- Proper Coiling: Coil cables loosely to avoid kinks or internal wire breakage. Avoid tight loops that stress the conductors.
- Designated Storage: Store cables in a dry, cool place away from corrosive substances and direct sunlight. Use a container or bag designed for jumper cables to prevent physical damage.
Adhering to these steps ensures your cables remain safe and functional for future use.
Frequently Asked Questions
Can Jumper Cables Damage My Car Battery?
Yes, improper jumper cable safety can damage your car battery by causing sparks or short circuits. Always avoid battery terminal corrosion by cleaning terminals beforehand.
Connect cables carefully to prevent electrical damage and guarantee safe jump-starting.
How Long Should I Wait Before Attempting to Jump-Start?
You should wait about three to five minutes after connecting jumper cables for restart timing. This allows your dead battery to charge slightly.
Always follow safety steps, like avoiding sparks and keeping cables secure, before starting.
Are There Specific Jumper Cables for Electric Vehicles?
You’ll find jumper cable types designed for EV charging compatibility, featuring higher gauge wires and specialized connectors. Using standard cables risks damage, so choose ones rated for high voltage and EV-specific protocols to ensure safe, effective jumps.
What Should I Do if My Car Won’T Start After Jumping?
If your car won’t start after jumping, check battery connections and ensure cables are secure. Test the battery’s charge to confirm it has enough power. Avoid off-topic questions about unrelated subjects; focus methodically on diagnosing electrical or starter system issues next.
Can I Jump-Start a Car in Extreme Weather Conditions?
You can jump-start a car in extreme weather, but you must follow strict safety precautions. Wear insulated gloves, ensure cables don’t touch, and keep the engine off until connections are secure. This helps prevent electrical hazards or damage.