How Connect Jumper Cables
To connect jumper cables safely, first ensure both vehicles are turned off and positioned close but not touching. Identify the positive (+, usually red) and negative (−, usually black) battery terminals on each vehicle.
Attach the red clamp to the dead battery’s positive terminal, then connect the other red clamp to the donor battery’s positive terminal. Next, connect the black clamp to the donor battery’s negative terminal.
Finally, clamp the remaining black cable to an unpainted metal surface on the dead vehicle, away from the battery. Start the donor car, wait a few minutes, then try to start the dead vehicle.
Following these exact steps protects your vehicle’s electrical system and increases the chances of a successful jump start. Discover detailed safety tips and troubleshooting next.
What Tools You Need to Connect Jumper Cables
What tools do you need to connect jumper cables safely and effectively? First, you must have a set of quality jumper cables with insulated clamps to prevent accidental shorts. Avoid relying on battery myths or jump start myths that suggest makeshift tools or outdated methods.
A reliable vehicle with a fully charged battery is essential as the power source. Additionally, ensure you have safety gloves and eye protection to guard against sparks or acid exposure. A flashlight can be helpful for nighttime situations.
You don’t need specialized equipment beyond these basics, but it’s crucial to use proper jumper cables designed for automotive batteries. By assembling these tools, you’ll set the foundation for a safe and efficient jump start process while dispelling common battery myths.
How to Identify Positive and Negative Battery Terminals
Having the right tools guarantee you can work safely, but correctly identifying the battery terminals is the next step before connecting jumper cables. Start by locating the battery chemistry label, which often indicates polarity.
Positive terminals usually have a plus sign (+) and are often red, while negative terminals show a minus sign (−) and are typically black. This color coding stems from jump start history, where consistent marking ensured safe, standardized connections.
Additionally, positive terminals sometimes have a larger post diameter. Before proceeding, verify both terminals clearly to avoid reverse polarity, which can damage electrical systems. Accurate identification based on these technical markers ensures a proper connection and prevents hazards during the jump start process.
Safety Tips Before Connecting Jumper Cables
Why should you prioritize safety before connecting jumper cables? Ensuring safety prevents injury and equipment damage. First, avoid wrong fuel handling by keeping the area free of gasoline or other flammable substances, as sparks may ignite fumes.
Always wear protective gloves and safety glasses to shield yourself from acid splashes. Confirm both vehicles are off, and remove metal jewelry to prevent electrical shorts. Inspect the jumper cables for damage or exposed wires before use.
Position the vehicles close but not touching to avoid accidental grounding. Be aware that car batteries contain hazardous materials; handle them responsibly and support proper battery recycling after disposal, minimizing environmental harm.
Prioritize these safety tips to maintain a secure and efficient jump-start process.
Step-by-Step Guide to Connecting Jumper Cables Safely
How do you connect jumper cables to ensure both safety and effectiveness? First, confirm both vehicles have compatible battery types; avoid connecting wrong battery types to prevent damage. Position the vehicles close without touching, then turn off both ignitions.
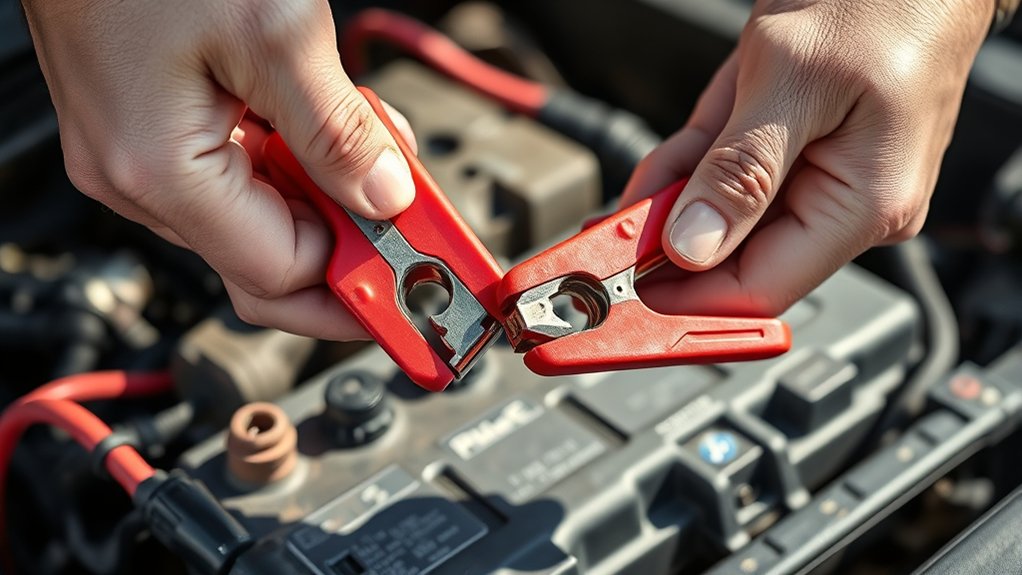
Attach the red clamp to the positive terminal of the dead battery, then connect the other red clamp to the positive terminal of the donor battery. Next, attach the black clamp to the negative terminal of the donor battery.
Finally, connect the remaining black clamp to an unpainted metal surface on the dead vehicle, away from the battery, to minimize spark risk. If jumper cables aren’t suitable, consider charging alternatives like portable jump starters or battery chargers.
Once connected, start the donor vehicle and follow recommended timing before attempting to start the dead vehicle.
Why Order Matters When Connecting Jumper Cables
Connecting jumper cables in the correct sequence reduces the risk of sparks, electrical shorts, and battery damage. You must attach the positive cable to the dead battery first, then to the live battery’s positive terminal.
Next, connect the negative cable to the live battery’s negative terminal, followed by attaching the other end to an unpainted metal surface on the dead vehicle’s engine block or chassis, never the negative terminal. This order ensures proper current flow and minimizes electrical hazards.
Following proper jump start etiquette protects both vehicles’ electrical systems and preserves battery care. Skipping or reversing steps can cause voltage spikes, damaging sensitive electronics.
Starting Your Car After Connecting Jumper Cables
When do you know it’s time to start the engine after attaching jumper cables? You need to ensure proper vehicle charging and avoid compromising battery maintenance. Follow these steps precisely:
- Keep the donor vehicle running to provide a stable power source.
- Wait 3-5 minutes to allow current flow and stabilize voltage in the dead battery.
- Attempt to start the dead vehicle’s engine, avoiding prolonged attempts that can damage the starter.
- Once started, disconnect cables in reverse order to prevent sparks and maintain circuit integrity.
This method ensures efficient energy transfer, protects your battery, and supports optimal vehicle charging. Adhering strictly to these steps will safeguard your battery maintenance efforts and help your car start reliably.
Troubleshooting When Your Car Won’t Start
Why won’t your car start even after properly connecting jumper cables? First, verify your battery terminals are clean and secure. Corrosion or loose connections can prevent proper current flow.
Ensure both vehicles are in park or neutral with parking brakes engaged for jump start safety. If the engine doesn’t crank, check the donor car’s battery voltage. A weak donor battery won’t supply sufficient power.
Inspect the jumper cables for damage or poor connection points. If the problem persists, your battery may be beyond recovery, indicating the need for battery maintenance or replacement.
Also, confirm the ignition is turned fully on and avoid rapid repeated attempts to start, which can damage the starter. Follow these steps systematically to identify and resolve the issue efficiently.
How to Disconnect Jumper Cables Safely
After successfully starting the vehicle, you’ll need to disconnect the jumper cables carefully to prevent sparks or damage. Proper cable removal is crucial for battery maintenance and follows key safety reminders.
Follow these steps to disconnect jumper cables safely:
- Turn off both vehicles to reduce electrical flow.
- Remove the black (negative) cable clamp from the previously dead battery first.
- Detach the black clamp from the donor vehicle’s battery.
- Finally, remove the red (positive) clamps from both batteries.
Always handle clamps by insulated grips, avoid contact between clamps, and ensure cables don’t touch metal surfaces during disconnection. This method minimizes the risk of electrical shorts, protecting both vehicles and ensuring effective battery maintenance.
When to Avoid Using Jumper Cables and Seek Professional Help
How do you know if jumper cables aren’t the right solution for your vehicle? First, if your battery is visibly damaged, such as leaking acid or corrosion, or if it repeatedly fails to hold a charge despite jump start attempts, avoid using jumper cables.
Also, modern vehicles with complex electronics or hybrid systems may require specialized jump start procedures; improper use can cause damage. For jump start safety, never attempt a jump if you’re unsure about the battery’s condition or the correct cable connection sequence.
Additionally, if your vehicle shows signs of electrical system issues beyond a dead battery, seek professional help. Prioritize battery maintenance by scheduling regular inspections, which can prevent situations where jumper cables aren’t appropriate or safe.
Maintaining Your Car Battery After a Jump-Start
Properly maintaining your car battery immediately following a jump-start is essential to guarantee reliable performance and extend its lifespan. After jump-starting, treat your battery like you would delicate indoor gardening equipment or precision pet grooming tools. Handle with care and attention.
Follow these steps:
- Drive for at least 30 minutes to allow the alternator to recharge the battery fully.
- Turn off all electrical accessories to reduce battery drain.
- Inspect battery terminals for corrosion, cleaning them if necessary with a baking soda solution.
- Schedule a professional battery test within 24 hours to assess its health and prevent unexpected failures.
Adhering to these practices ensures your battery remains reliable, just as you’d maintain your indoor gardening setup or pet grooming supplies for optimal performance.
Common Mistakes to Avoid When Connecting Jumper Cables
When connecting jumper cables, you must place the clamps on the correct terminals to prevent damage. Always ensure both engines are off before attaching the cables to avoid electrical hazards. Never mix the cable polarity—connecting positive to negative can cause serious damage to both vehicles.
Incorrect Clamp Placement
Why do clamp placements often cause issues during jumper cable use? Incorrect clamp placement can lead to poor electrical connection, sparks, or damage to your vehicle’s electrical system. Avoid treating clamp placement as an irrelevant topic or an unrelated concept; it’s crucial for safety and effectiveness. Follow these key points:
- Attach the red clamp to the positive (+) terminal of the dead battery first.
- Connect the other red clamp to the positive terminal of the live battery.
- Secure the black clamp to the negative (−) terminal of the live battery.
- Clamp the remaining black cable to an unpainted metal surface on the dead car’s engine block, away from the battery.
Correct clamp placement ensures a stable circuit and minimizes risk during jump-starting.
Ignoring Engine Off
Incorrect clamp placement can cause sparks or damage, but equally important is ensuring both vehicles’ engines are off before connecting jumper cables. Starting with engines on risks voltage spikes or electrical surges that can damage sensitive components.
When the engines run, the alternators generate current, making the electrical system unstable for safe cable connection. Ignoring this step is a common mistake that can lead to blown fuses or worse.
Don’t confuse this requirement with an irrelevant topic like battery age or unrelated concept such as cable length; these don’t impact the immediate safety of the connection process. Always double-check that both ignition switches are off and keys removed before attaching cables.
This simple precaution prevents damage and ensures a controlled, safe jump start.
Mixing Cable Polarity
How can you avoid damaging your vehicle’s electrical system during a jump start? The key is preventing mixing polarity when connecting jumper cables. Incorrectly attaching positive to negative terminals can cause serious damage and pose arc safety risks.
Follow these steps precisely:
- Identify the positive (+) and negative (−) terminals on both batteries.
- Connect the positive cable clamp to the dead battery’s positive terminal first.
- Attach the other end of the positive cable to the live battery’s positive terminal.
- Connect the negative cable clamp to the live battery’s negative terminal, then to a grounded metal surface on the dead vehicle away from the battery.
Frequently Asked Questions
Can Jumper Cables Damage My Car’s Electrical System?
Yes, jump start risks include electrical glitches that can damage your car’s system if cables connect incorrectly or power surges occur. Avoid non relevant discussion; follow precise procedures to minimize damage and guarantee safe operation every time you jump start.
How Long Should I Wait Between Jump-Start Attempts?
You should wait about 3-5 minutes between jump-start attempts to let the battery rest and avoid overheating. This pause ensures safety considerations are met and prevents damage.
Any longer waiting period is generally not applicable.
Are All Jumper Cables Compatible With Any Vehicle Type?
Not all jumper cables fit every vehicle type; you need to contemplate cable gauge and length for compatibility.
Always follow safety precautions and non-technical considerations, like ensuring secure connections and avoiding sparks, to jump-start safely and effectively.
Can I Jump-Start a Car in Extreme Weather Conditions?
You can confidently conduct a car jump-start in extreme weather, but you’ve got to gather great safety precautions. Ensure cables are dry, avoid metal contact, and follow proper connection order to prevent sparks or damage.
What Should I Do if the Cables Overheat During Use?
If you notice overheating cables, immediately disconnect them to prevent damage. Follow safety precautions by allowing cables to cool completely before reuse.
Inspect the cables for damage and ensure you are using the proper gauge and connection to avoid future overheating.